Difference between revisions of "Garmin"
(Created) |
|||
| (7 intermediate revisions by the same user not shown) | |||
| Line 1: | Line 1: | ||
| − | == GARMIN TROUBLESHOOTING == | + | == GARMIN TROUBLESHOOTING for Garmin Nuvi models== |
| − | If you are experiencing issues with your Garmin, please read this portion. | + | If you are experiencing issues with your Garmin Nuvi ''(any model number)'', please read this portion. |
===== POSSIBLE INTERNAL STORAGE FULL ===== | ===== POSSIBLE INTERNAL STORAGE FULL ===== | ||
| Line 7: | Line 7: | ||
One of the reasons we delete calls after completion is to save storage in the Garmin. However, this can also be done by the dispatcher. We can send a command to remove all the Service Orders. | One of the reasons we delete calls after completion is to save storage in the Garmin. However, this can also be done by the dispatcher. We can send a command to remove all the Service Orders. | ||
| − | 1. In | + | 1. In RemoteFieldView we can navigate to ADMINISTRATION -> DEVICE MAINTENANCE. Select your device and go to the GENERATE CONFIG. FILE Tab. |
| − | 2. Select the | + | 2. Select the DELMSG-CAL option from the drop down menu and click SEND CONFIGURATION(UDP) button:<br> |
| − | + | ||
| + | [[File:DeletingQuickMessagesCalamp.png|frame|center|DeleteQuickMessages]] | ||
This will wipe out all Service Calls in the Garmin Storage. | This will wipe out all Service Calls in the Garmin Storage. | ||
| Line 17: | Line 18: | ||
This requires setting the Garmin back to factory status. Next page. | This requires setting the Garmin back to factory status. Next page. | ||
| − | |||
| − | |||
===== Resetting Garmin to Factory Status ===== | ===== Resetting Garmin to Factory Status ===== | ||
| Line 28: | Line 27: | ||
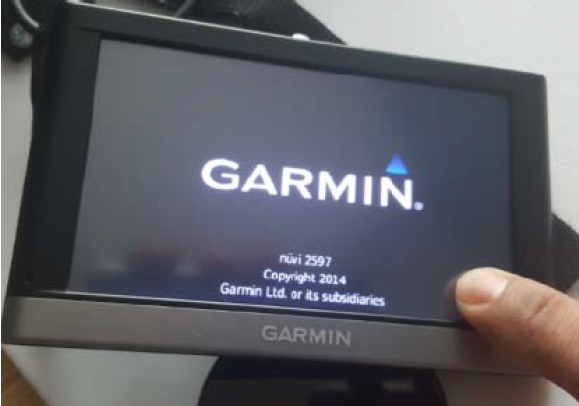
2. With the Garmin OFF, click the power button once. Immediately after seeing the Garmin Logo, place your finger on the lower right corner and hold your finger in place. | 2. With the Garmin OFF, click the power button once. Immediately after seeing the Garmin Logo, place your finger on the lower right corner and hold your finger in place. | ||
| − | + | [[File:GarminReset1.png|frame|center|Resetting Garmin]] | |
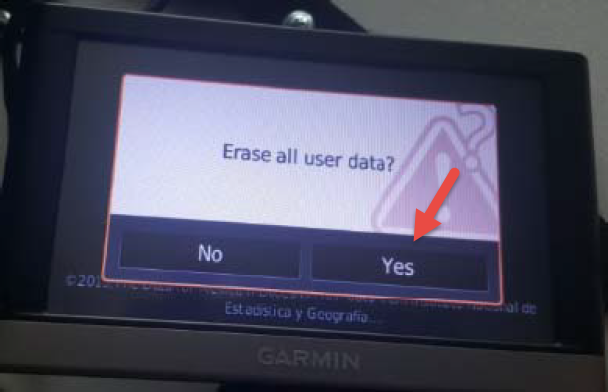
3. You will be presented with a screen asking to Erase all user Data. Click YES | 3. You will be presented with a screen asking to Erase all user Data. Click YES | ||
| + | [[File:GarminReset2.png|frame|center|Garmin Reset All Data]] | ||
4. Resend Quick Messages and you’re ready to use. | 4. Resend Quick Messages and you’re ready to use. | ||
| − | + | [[File:SendQuickMessages.png|frame|center|Send Quick Messages]] | |
| Line 41: | Line 41: | ||
There are times when the Quick Messages are corrupted or missing partially. We can reset the messages by following this procedure with the vehicle running. | There are times when the Quick Messages are corrupted or missing partially. We can reset the messages by following this procedure with the vehicle running. | ||
| − | 1. In | + | 1. In RemoteFieldView we can navigate to ADMINISTRATION -> DEVICE MAINTENANCE. Select your device and go to the GENERATE CONFIG. FILE Tab. |
| − | 2. Select the | + | 2. Select the DELMSG-CAL option from the drop down menu and click SEND CONFIGURATION(UDP) button: |
| − | + | [[File:DeletingQuickMessagesCalamp.png|frame|center|DeleteQuickMessages]] | |
3. Allow up to 3 minutes to pass. This will delete all QUICK MESSAGES from the Garmin. | 3. Allow up to 3 minutes to pass. This will delete all QUICK MESSAGES from the Garmin. | ||
| − | 4. Now, in the same screen, select the | + | 4. Now, in the same screen, select the QUKMSG-CAL option from the drop down menu and click SEND CONFIGURATION(UDP) button: |
| − | + | [[File:SendQuickMessages.png|frame|center|Send Quick Messages]] | |
5. Messages have been deleted and resent. | 5. Messages have been deleted and resent. | ||
| + | |||
| + | == GARMIN TROUBLESHOOTING for Garmin DriveSmart 51/61 LMT-S models== | ||
| + | If you are experiencing issues with your Garmin, please read this portion. | ||
| + | |||
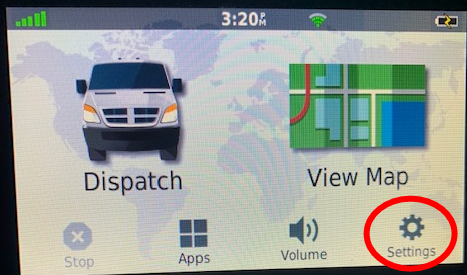
| + | To reset Garmin, click on Settings icon in bottom right corner: | ||
| + | [[File:DriveSmartReset1.png|frame|center|GarminDriveSmartReset1]] | ||
| + | |||
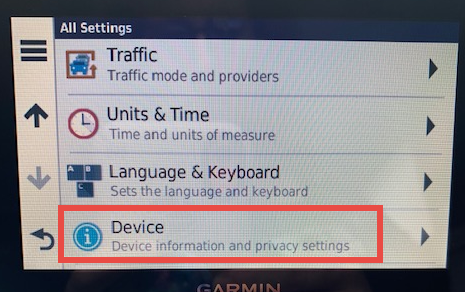
| + | Scroll down to bottom of menu and click on Device: | ||
| + | [[File:DriveSmartReset2.png|frame|center|GarminDriveSmartReset2]] | ||
| + | |||
| + | Scroll to bottom of menu and click on Reset: | ||
| + | [[File:DriveSmartReset3.png|frame|center|GarminDriveSmartReset3]] | ||
| + | |||
| + | Click on Delete Data and Reset Settings: | ||
| + | [[File:DriveSmartReset4.png|frame|center|GarminDriveSmartReset4]] | ||
| + | |||
| + | Click on Yes: | ||
| + | [[File:DriveSmartReset5.png|frame|center|GarminDriveSmartReset5]] | ||
| + | |||
| + | Unit will restart. Please select United States/English: | ||
| + | [[File:DriveSmartReset6.png|frame|center|GarminDriveSmartReset6]] | ||
| + | |||
| + | RESENDING QUICK MESSAGES TO GARMIN | ||
| + | |||
| + | To resend quick messages back to the Garmin, go to Device Maintenance: | ||
| + | [[File:SendQuickMessagesAdmin.png|frame|center|SendQuickMessagesGarmin1]] | ||
| + | |||
| + | Click on orange arrow by Device that is connected to the Garmin you just reset: | ||
| + | [[File:SendQuickMessagesDevice.png|frame|center|SendQuickMessagesGarmin2]] | ||
| + | |||
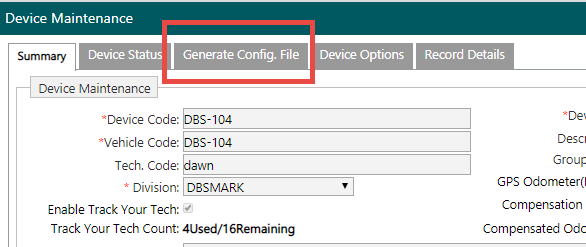
| + | Click on Generate Config. File Tab: | ||
| + | [[File:SendQuickMessagesConfig.png|frame|center|SendQuickMessagesGarmin3]] | ||
| + | |||
| + | From Drop down menu, choose QUKMSG-CAL, click Send Configuration button: | ||
| + | [[File:SendQuickMessagesUDP.png|frame|center|SendQuickMessagesGarmin5]] | ||
| + | |||
| + | While unit is on, Quick Messages will be uploaded back to the Garmin. | ||
Latest revision as of 12:47, 25 March 2020
Contents
GARMIN TROUBLESHOOTING for Garmin Nuvi models
If you are experiencing issues with your Garmin Nuvi (any model number), please read this portion.
POSSIBLE INTERNAL STORAGE FULL
If your Garmin is not able to receive calls but was able to before, it may mean that the Garmin internal storage is full.
One of the reasons we delete calls after completion is to save storage in the Garmin. However, this can also be done by the dispatcher. We can send a command to remove all the Service Orders.
1. In RemoteFieldView we can navigate to ADMINISTRATION -> DEVICE MAINTENANCE. Select your device and go to the GENERATE CONFIG. FILE Tab.
2. Select the DELMSG-CAL option from the drop down menu and click SEND CONFIGURATION(UDP) button:
This will wipe out all Service Calls in the Garmin Storage.
Sometimes, the device is too full and we cannot delete remotely. This normally means that the device may be locked and not responding. You may need to wipe it all.
This requires setting the Garmin back to factory status. Next page.
Resetting Garmin to Factory Status
Sometimes, it may be required to reset your Garmin to factory status. This will required you to follow this procedure.
1. Turn the Garmin OFF by holding the power button.
2. With the Garmin OFF, click the power button once. Immediately after seeing the Garmin Logo, place your finger on the lower right corner and hold your finger in place.
3. You will be presented with a screen asking to Erase all user Data. Click YES
4. Resend Quick Messages and you’re ready to use.
QUICK MESSAGES RESETTING
There are times when the Quick Messages are corrupted or missing partially. We can reset the messages by following this procedure with the vehicle running.
1. In RemoteFieldView we can navigate to ADMINISTRATION -> DEVICE MAINTENANCE. Select your device and go to the GENERATE CONFIG. FILE Tab.
2. Select the DELMSG-CAL option from the drop down menu and click SEND CONFIGURATION(UDP) button:
3. Allow up to 3 minutes to pass. This will delete all QUICK MESSAGES from the Garmin.
4. Now, in the same screen, select the QUKMSG-CAL option from the drop down menu and click SEND CONFIGURATION(UDP) button:
5. Messages have been deleted and resent.
GARMIN TROUBLESHOOTING for Garmin DriveSmart 51/61 LMT-S models
If you are experiencing issues with your Garmin, please read this portion.
To reset Garmin, click on Settings icon in bottom right corner:
Scroll down to bottom of menu and click on Device:
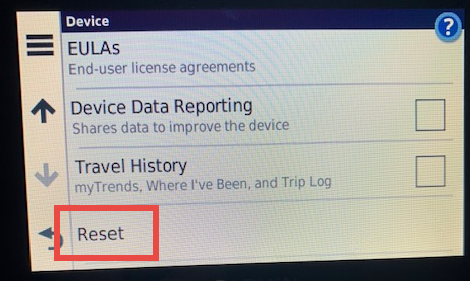
Scroll to bottom of menu and click on Reset:
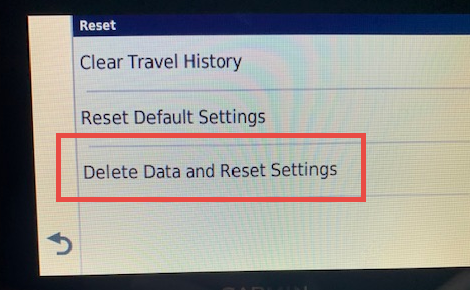
Click on Delete Data and Reset Settings:
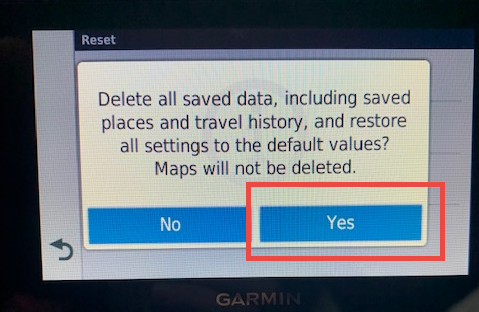
Click on Yes:
Unit will restart. Please select United States/English:
RESENDING QUICK MESSAGES TO GARMIN
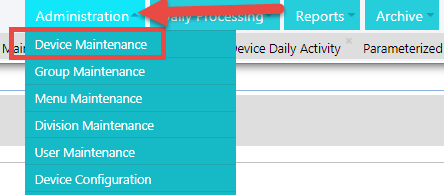
To resend quick messages back to the Garmin, go to Device Maintenance:
Click on orange arrow by Device that is connected to the Garmin you just reset:
Click on Generate Config. File Tab:
From Drop down menu, choose QUKMSG-CAL, click Send Configuration button:
While unit is on, Quick Messages will be uploaded back to the Garmin.

