Daily Processing Menu
Contents
- 1 DAILY PROCESSING MENU
- 1.1 Device Current Status
- 1.2 Device Daily Activity
- 1.3 Define Landmark
- 1.4 Events
- 1.4.1 Standard settings for all Events
- 1.4.2 Schedule Type
- 1.4.3 Notification Tab
- 1.4.4 Device Tab
- 1.4.5 History Tab
- 1.4.5.1 Landmark Event
- 1.4.5.2 Idling Event
- 1.4.5.3 Mileage Event
- 1.4.5.4 Off-Hours Use Event
- 1.4.5.5 Speeding Event
- 1.4.5.6 Stop Count Event
- 1.4.5.7 Stop Duration Event
- 1.4.5.8 Technician Call Event
- 1.4.5.9 Main Power Off Event
- 1.4.5.10 Towing Event
- 1.4.5.11 Driver Behavior Event
- 1.4.5.12 OBDII Unit Events
- 1.5 RemoteView
- 1.6 Tech Service Orders
- 1.7 Messages
- 1.8 Driver Behavior Dashboard
- 1.9 Driver Behavior Buttons
DAILY PROCESSING MENU
The Daily Processing Menu is the main area where you will be able to track devices, view activity, view route history, view service orders, create landmarks, and create Event Notifications for all devices.
Each section will be covered in detail in its respective section.
Device Current Status
Device Current Status is the first menu function. It is where you can get the device status for all your vehicles. It will show the devices in a grid-style format, showing Vehicle Name, Tech Code, Status, Date, Time, Lat/Long, Location, Ignition status, and Garmin Status.
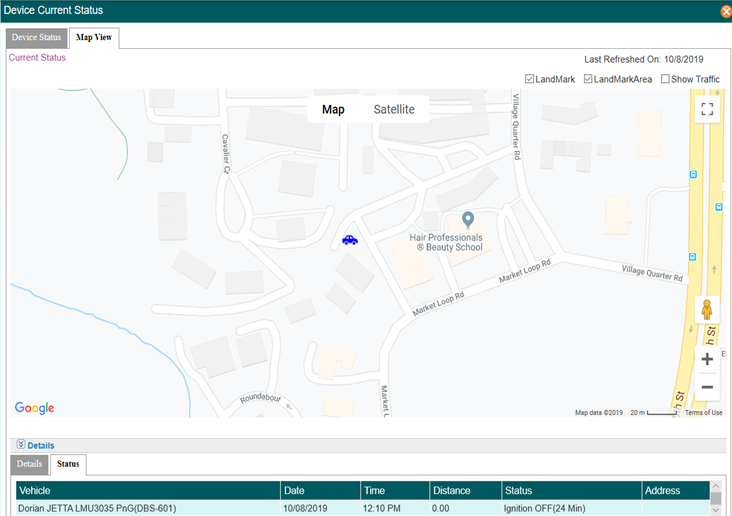
You can use the Orange Arrow Icon to expand the details for each device. This will show you a map with the truck location and the last status received by the device.
You may click on the Refresh Icon (Top Right Hand Corner) to refresh overall data.
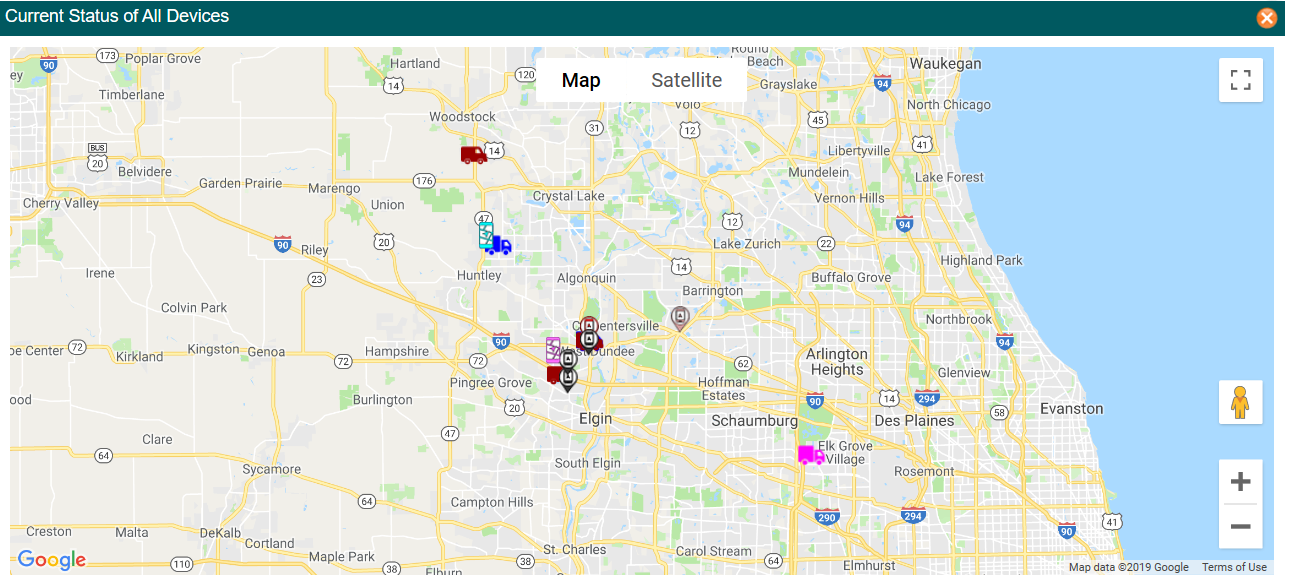
You can also map all your vehicles on a map by clicking the “Display all Vehicles On Map” button. Doing this will display a map with all the vehicle icons shown in their last know location.
While this is a great tool, Viewing all your vehicles in a map, is even more powerful through RemoteView. A Section covered in this same guide.
Back To Top
Device Daily Activity
Device Daily activity is a quick report that can be used to view the daily activity of your fleet. You can create reports for the entire fleet, a group or a single specified vehicle. You may customize your own parameters and customize your report to give you the information you want to view.
- Division - Select the Division, if your company only has one, there will only be one option.
- Group - You may select a group to narrow down your search or to run a report on the entire group. You may leave as is, to run the report on the entire Division.
- Vehicle - You may select a single Vehicle or leave as-is for a full group report.
- Display Results in One Page - Selection required if you do not wish to navigate through pages. This will show all results in one page.
- From Date - Starting Date to run Report.
- Time - Starting Time to run Report.
- To Date - Ending Date to run Report.
- Time - Ending Time to run Report.
- Exclude Motion Detection Events - Exclude any records for Motion Detection.
- Exclude MiniMoving Events - Exclude any records for MiniMoving Events. MiniMoving Events are events that occur within the normal 2 minute reporting intervals. RFV devices send data every 2 minutes. These are main Moving events. In those two minutes, we record movement every 20 seconds. The main Moving event sends all MiniMoving events along with it, which could create a lot of data which you may or may not find useful. Checking this box will only provide the Main events to declutter the report for easier reading.
- Find - The FIND button is used to display the results on the web browser. Used when report is for viewing only.
- Run Report - The Run Report button is used to create a report via Crystal Reports, if you need to print or e-mail to another person.
If you choose to Run Report, you will see the following options:
- To Screen - You can see the report on Screen
- To File – Sends report to PDF format and downloads the reports for you.
- To Email - Creates the PDF Document and sends it to desired e-mail address.
Define Landmark
Landmarks are used to create locations of interest in your map. This helps to give you a visual aid in you map of how close a vehicle is to a predefined location. We will go over setting up Landmarks and how to properly use them.
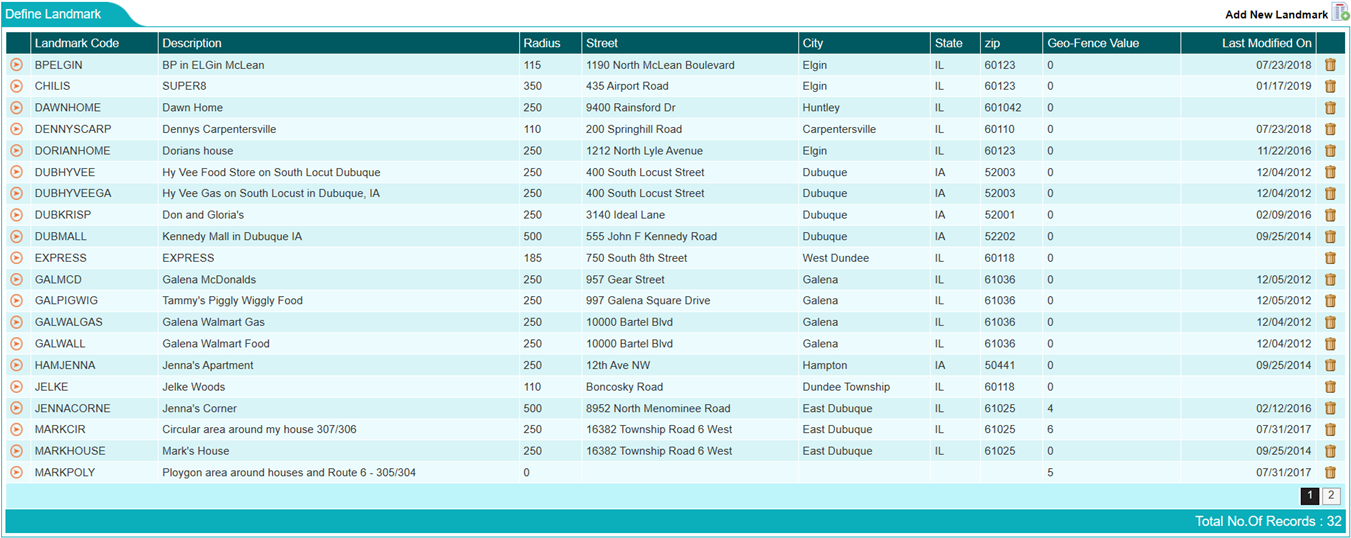
The Landmark screen should look like the example below, if you are new client, it will be blank.
You can create a new one by clicking Add New Landmark.
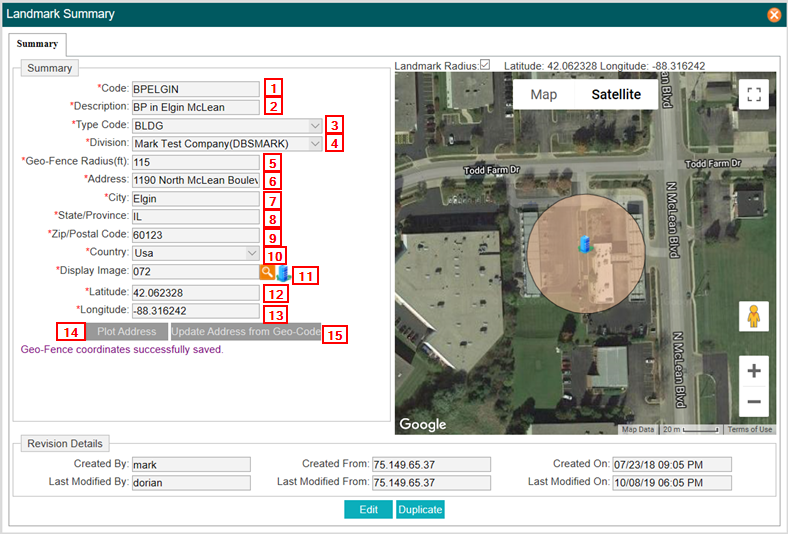
The form will need to be filled in with your landmark’s information.
- Code - Short Code for your Landmark.
- Description - Description of your Landmark.
- Landmark Type Code - Choose from Airport, Bldg. (Building), Cmp-Shop (Company Shop), Cust-Loc (Customer Location), Factory, Home, Tower, Vend-Loc (Vendor Location)
- Division - Your Company Division Name.
- Geo-Fence Radius (ft) - Geo-Fence Radius is used to create a geo-coded radius around your newly created landmark. While your GPS location is interpreted as a latitude and longitude point on a map, the Geo-fence, allows your landmark to be a bigger presence on the map. This allows your landmark to create a barrier that, when entered/exited, can trigger notifications for you. We suggest that you start your geo-fence radius at 250 and adjust as you see fit.
- Address - Street Address
- City
- State/Provence
- Zip/Postal Code
- Country
- Display Image - You can select an icon that best fits your landmark location.
- Latitude - Set to 0.000000. These are updated when you plot your address. We will discuss this below.
- Longitude - Set to 0.000000. These are updated when you plot your address. We will discuss this below.
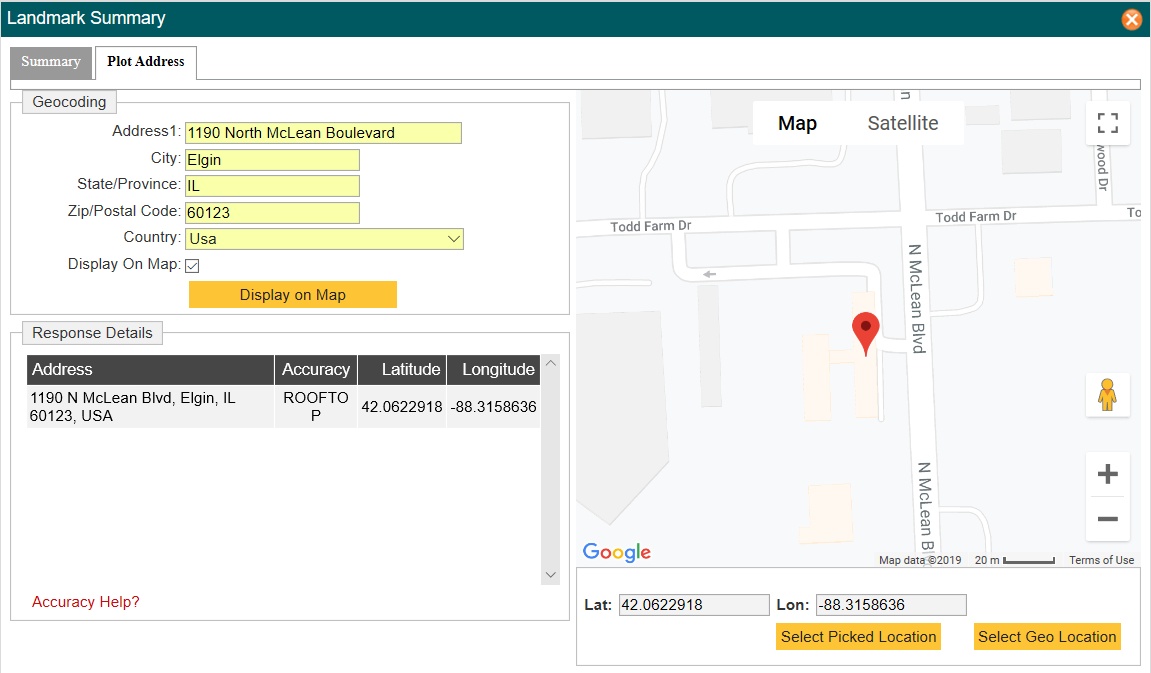
- Plot Address - If you only have an address, this button will perform a Forward GeoCode request to get the closest Coordinates to the address provided.
- Update Address from Geo-Code - If you only have coordinates, this button will perform a Reverse GeoCode request to get the closest address to the coordinates provided.
If your location is correct after clicking on Plot Address simply click on Select Geo Location. Click OK and your Landmark is now created successfully.
The accuracy of the coordinates may be poor at times, as GPS coordinates are always evolving.
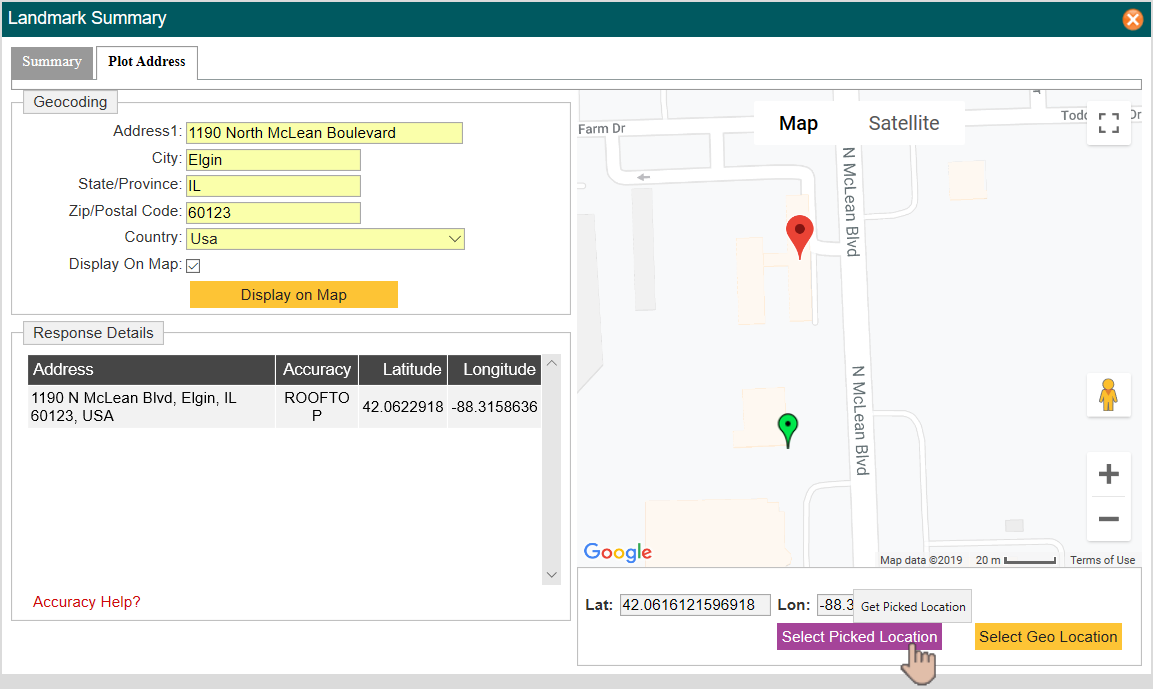
If you feel that the Red pin is not accurately displaying your location, you can adjust the coordinates while getting the location. Simply click on the map location that you wish to select, and it twill drop a green pin. Then click on Select Picked Location to select those coordinates.
br>
Click OK and you now have your landmark created.
If you ever need to edit the location, you can simply open your existing Landmark, and click the Orange Arrow Icon. You can geocode your location again and/or change any values as needed.
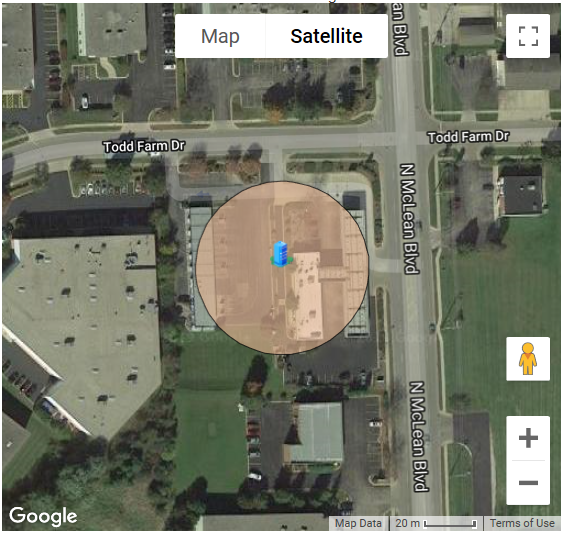
You can visualize your geofence on the map by using the Landmark Radius option.
As you can see, the radius allows you to see where your geofence exists and where a vehicle would activate a geocode notification.
Note: The procedure for creating Landmarks is only used for displaying the landmarks on the map. In order to create notifications, you will need to set up Landmark Events. We will explain how to setup these events in the EVENTS portion below.
Back To Top
Events
Events are used to create automatic e-mail notifications on specific events and also used to log Event activation. These can be created for various events that will be covered in this section. RemoteField View has several device types. Each device has its own events while others may not be allowed.
- One of these differences is OBDII Data. The LMU3035 (Plug-and-Go unit) is capable of retrieving some OBDII Data and will trigger alerts if the data is available to us, these events will only apply to these units.
- Mobile Tracking App. Limited to some events as they are using the mobile Device to track the technicians location.
- There are also common events that can be used across all devices.
The Plug-and-Go unit is able to get information from the on-board computer. However, we are limited to some information depending on the manufacturer of the vehicle, and if they allow that data to be retrieved. As such, not all data will be available.
The following list of events are available as common events for all units:
- Landmark
- Idling
- Mileage (Not available for Mobile App)
- Off-Hours Use
- Speed
- Stop Count
- Stop Duration
- Technician Call
- Main Power Off
- Towing
- Driver Behavior
The following Events are available for the LMU3035 (Plug-and-Go Unit). Subject to available vehicle data retrieval:
- Low Fuel
- Low Battery Voltage
- MIL Active
- ABS Light Active while Driving
- Engine Oil Temp High
- Coolant Temp High
- Seat belt Not Fastened
- Engine Oil Pressure High
We will go over setting up each event for your company, how to set up notifications, and how to set up vehicle monitoring.
Standard settings for all Events
All events have 4 sections in common. Please read this portion to understand how notification will work. - Schedule Type - Notification Tab - Device Tab - History
Schedule Type
We will need to select our Schedule for when this event should be monitored. This is done in the SCHEDULE TYPE section. 24 X 7 is a default. It will monitor the event all week and 24 hours a day. The other option is for Weekdays only, with start and stop hours.
For my Landmark Event example, I will leave it at 24x7 as I wish to monitor at all times.
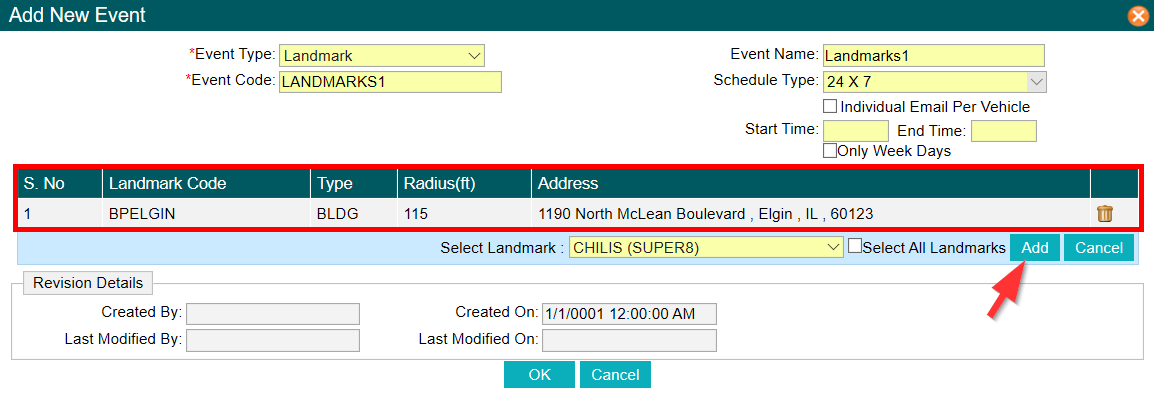
I added my BPELGIN landmark by clicking ADD.
Click OK to continue.
Next, we will setup who receives the NOTIFICATIONS.
Notification Tab
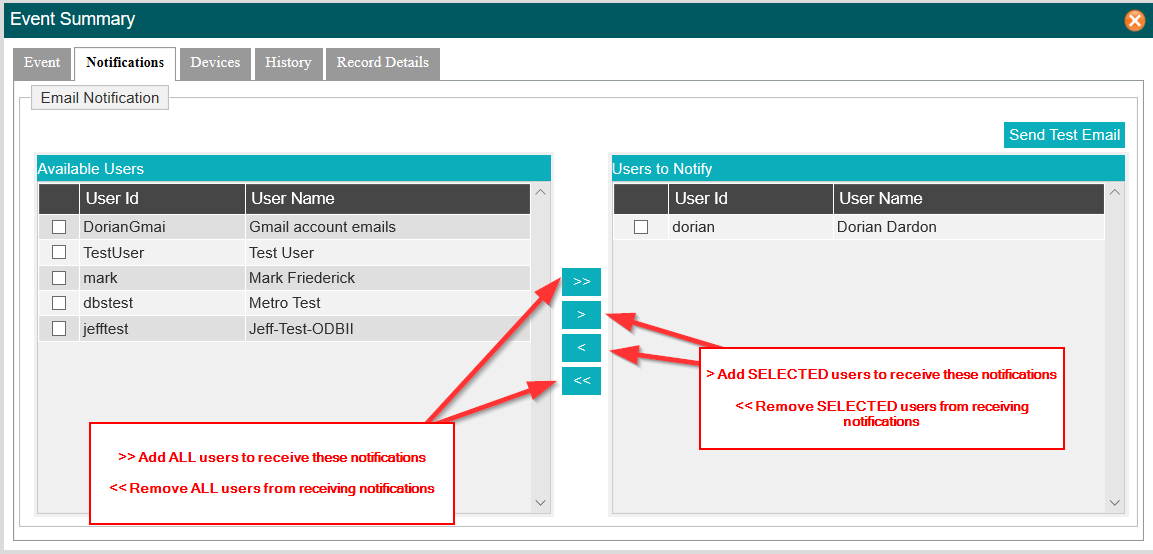
The Notification Tab is where we dictate which user will receive notifications. You may not want all users to get notification for a certain event. Like all the other screens, the left hand side is your list of available items, and the right side is the list of items that belong to this event.
In this example, I only have one user (Dorian) who will receive notifications belonging to this event. This is why creating users for each employee is crucial for notifications.
Each user has an email address assigned. We will use the email address that is assigned to the user to send emails. You can click the Send Test Email button to test that all users are able to receive the notification.
Next, we will move to the DEVICES TAB to select the vehicles that will be part of this Event.
Device Tab
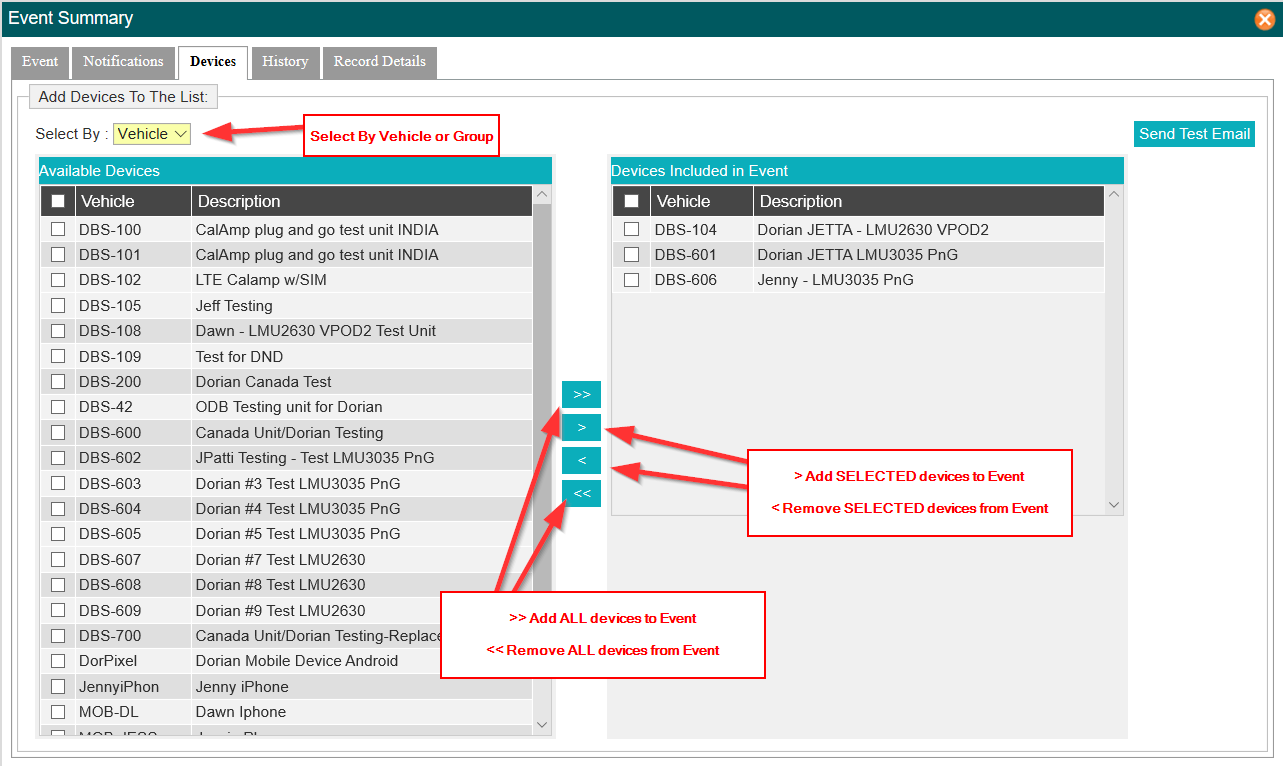
The DEVICES TAB is used to add devices to this event. I can set my event to only monitor certain devices or all, depending on how you want to monitor this event.
Like all the other screens, the left hand side is your list of available items, and the right side is the list of items that belong to this event.
The Select By field is used to view all vehicles, or filter by groups to make it easier to find your device.
In this example, I have 3 Devices subject to this Event. This means that the Landmark event will only be triggered when those three devices arrive/depart the landmark in this event.
History Tab
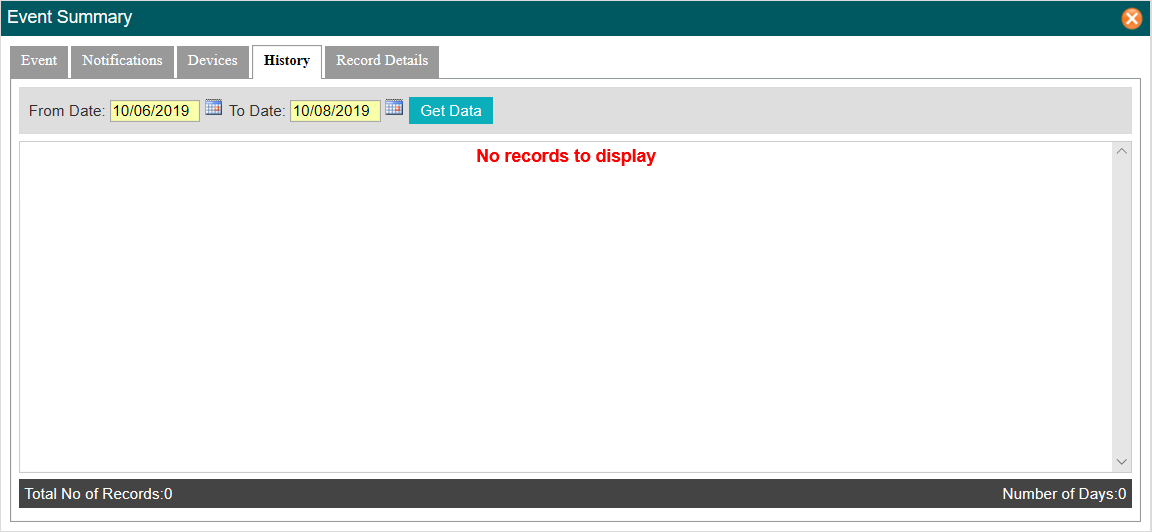
The HISTORY TAB will list all the events recorded to this event.
You may query here for any events that have been triggered. Simply select a start and end date time to get the history.
Now that we’ve gone through the common settings, we can explain each Event and their purpose.
Landmark Event
The Landmark Event is useful for automatically reporting when a vehicle arrives or departs from a specific landmark.
* You can create one event to monitor multiple landmarks.
* Create one event for only one specific landmark.
* Create separate events to monitor a group of vehicles.
* Create one Event for a single device.
As we mentioned in the Landmark section, geofences set on your landmarks, are important for this event as we will use the geofence radius to know when a device has arrived/departed.
To continue with this example, we will assume that you have already defined one or more landmarks.
First, click on Add New Event and select the Event Type as Landmark.
- Event Type – Landmark
- Event Code – Landmark Code (Keyword) 10 Character Max.
- Event Name – Full name of the Event you are creating.
- Schedule Type – Schedule type can be set to two different settings. You can monitor 24 hours a day (default) or you can create your own schedule to monitor this event. For example, only Mon-Fri and only from 8am to 5pm. You can customize this to fit your needs. This can be changed later.
- Individual email per Vehicle – can be checked if you wish to get an email for each vehicle instead of having them all grouped in a single email notification.
- Select Landmark – Will list all the landmarks we created in the Define Landmark section prior.
- Select All Landmarks – You can also select all landmarks if you wish to have all landmarks used in one single event.
- Add – You can add one landmark at a time if you want to have multiple landmarks, but not all.
After clicking OK, move on to modify the Notifications and Devices Tabs.
Idling Event
Idling events are used to monitor when a vehicle is idling for more than a predefined amount of time. For example, if you do not want your employees to idle a vehicle for more than 15 minutes, you can create this event with a Maximum Allowed Time of 15 minutes. Should a vehicle idle for 16 minutes, a notification will be sent to any user that is part of this event notification.
- Event Type - Idling
- Event Code - Idle Event Code (Keyword) 10 Character Max.
- Event Name - Full name of the Event you are creating.
- Schedule Type - Schedule type can be set to two different settings. You can monitor 24 hours a day (default) or you can create your own schedule to monitor this event. For example, only Mon-Fri and only from 8am to 5pm. You can customize this to fit your needs. This can be changed later.
- Individual email per Vehicle - Checked if you wish to get an email for each vehicle instead of having them all grouped in a single email notification.
- Maximum Allowed Idle Time - Set time in Minutes
- Maximum Idling Time Notification - Send the notification to Garmin Device, Only available to devices that have the Garmin Device.
After clicking OK, move on to modify the Notifications and Devices Tabs.
Mileage Event
Mileage Event is used to set limits on how many miles can be driven per day, week or specific time frame.
- Event Type - Mileage
- Event Code - Mileage Event Code (Keyword) 10 Character Max.
- Event Name - Full name of the Event you are creating.
- Schedule Type - Schedule type will be used for this event to keep track of mileage during your set schedule. You will be able to set mileage limits for a day, a week, or custom time frame.
- Individual email per Vehicle - can be checked if you wish to get an email for each vehicle instead of having them all grouped in a single email notification.
- Maximum Mileage - Set Mileage limit.
After clicking OK, move on to modify the Notifications and Devices Tabs.
Off-Hours Use Event
Off-Hours Use Event is used to monitor when vehicles are being used after work hours. By creating a schedule of your work hours, you can get notifications when a vehicle is used after your scheduled work hours.
- Event Type - Off Hours Use
- Event Code - Off Hours Event Code (Keyword) 10 Character Max.
- Event Name - Full name of the Event you are creating.
- Schedule Type - Schedule should be set to 24x7 here since we want to monitor the entire week at all hours
- Individual email per Vehicle - can be checked if you wish to get an email for each vehicle instead of having them all grouped in a single email notification.
- Normal Work Hours - This will be used to set your work hours. Hours are set in 24-hour format. The hours you are setting are work hours. Any event that happens outside of these hours will be considered OFF HOURS.
After clicking OK, move on to modify the Notifications and Devices Tabs.
Speeding Event
Speeding Events are used to track vehicle speeding on the road. There are two different types of speeding events. The first event is called Max Speed Event. The Max Speed Event is used to track the MAXIMUM speed the vehicle is allowed to drive at all times. While the Check against Speed Limit is used to check vehicle speed against the posted speed limits.
Posted Speed limits are subject to availability. These are subject to changes and may not always be 100% accurate.
- Event Type - Speed
- Event Code - Speed Event Code (Keyword) 10 Character Max.
- Event Name - Full name of the Event you are creating.
- Schedule Type - Schedule type can be set to two different settings. You can monitor 24 hours a day (default) or you can create your own schedule to monitor this event. For example, only Mon-Fri and only from 8am to 5pm. You can customize this to fit your needs. This can be changed later.
- Individual email per Vehicle - can be checked if you wish to get an email for each vehicle instead of having them all grouped in a single email notification.
- Maximum Allowed Speed - This is where you can set the allowed Maximum speed for the device at any given time. You will only be notified when the device exceeds the speed stated. Not against Posted Speed limits.
- Update Unit - Is used to send the allowed speeding limit to the device. This should be clicked AFTER you add vehicles so the software knows which units will be receiving the max speed.
- Activate Speed Notification to Garmin - Speed warning will be sent to Garmin. Only available if you have Garmin integration.
- Display Message On Garmin Immediately - Speed warning will be sent to Garmin immediately.
- Speeding Summary Email - Speeding events can be sent in a summary instead of receiving emails
There are different setting when you want to check against posted Speed Limits:
Check against Speed Limit – Is used to check the speed of the vehicle against Posted Speed Limits. When checked, the window will change to show one more setting:
Allowed Speed Over Limit – To set amount a vehicle is allowed to speed over posted Speed Limits. Only available when checking against speed limits. Not for Max Speeding.
After clicking OK, move on to modify the Notifications and Devices Tabs.
Stop Count Event
Stop Count Event is used to see how many stops a vehicle has made. The definition of a “STOP” is when a vehicle arrives at a location and turns the ignition OFF and then back ON. Example: If a technician only has 2 jobs, then by definition, there should be two stops. But if the tech stops at a gas station, this is now 3 stops. If your event lists a maximum of 2 stops per day, then the 3rd stop would initiate a notification.
- Event Type - Stop Count
- Event Code - Stop Count Event Code (Keyword) 10 Character Max.
- Event Name - Full name of the Event you are creating.
- Schedule Type - Schedule type can be set to two different settings. You can monitor 24 hours a day (default) or you can create your own schedule to monitor this event. For example, only Mon-Fri and only from 8am to 5pm. You can customize this to fit your needs. This can be changed later.
- Individual email per Vehicle - can be checked if you wish to get an email for each vehicle instead of having them all grouped in a single email notification.
- Max Stop Count Per Day –The number of stops allowed for 24 hours.
After clicking OK, move on to modify the Notifications and Devices Tabs.
Stop Duration Event
Stop Duration Event is used if there is a specific maximum time a technician should be at for all calls. For example, each stop should take 30 minutes, you would enter 30 minute maximum time. If the tech stays at the stop for more than 30 minutes a notification will be sent to show the tech has taken longer than allowed time.
- Event Type - Stop Duration
- Event Code - Stop Duration Event Code (Keyword) 10 Character Max.
- Event Name - Full name of the Event you are creating.
- Schedule Type - Schedule type can be set to two different settings. You can monitor 24 hours a day (default) or you can create your own schedule to monitor this event. For example, only Mon-Fri and only from 8am to 5pm. You can customize this to fit your needs. This can be changed later.
- Individual email per Vehicle - can be checked if you wish to get an email for each vehicle instead of having them all grouped in a single email notification.
- Minimum Stop Time – The number minutes allowed at stop.
- Maximum Stop Time Notification – Send the maximum time spent at stop.
After clicking OK, move on to modify the Notifications and Devices Tabs.
Technician Call Event
Technician Call Event is available to Global Edge Users only. It is used when GE settings are setup to track Technician Arrival/Departure. S2K/Vision Users do not have this feature. You would also not want to use this if you have RFS implementation as the information will be redundant.
- Event Type - Technician Call
- Event Code - Technician Call Event Code (Keyword) 10 Character Max.
- Event Name - Full name of the Event you are creating.
- Schedule Type - Schedule type can be set to two different settings. You can monitor 24 hours a day (default) or you can create your own schedule to monitor this event. For example, only Mon-Fri and only from 8am to 5pm. You can customize this to fit your needs. This can be changed later.
- Individual email per Vehicle - can be checked if you wish to get an email for each vehicle instead of having them all grouped in a single email notification.
- Arrival Notice - Get notification of arrival at job site.
- Departure Notice - Get notification of departure from job site.
- Stop Time Notice - Get notification of duration of call.
After clicking OK, move on to modify the Notifications and Devices Tabs.
Main Power Off Event
Main Power Off Event is used to see if a technician is tampering with the GPS unit by unplugging it from its main power supply. A notification is sent when the unit is unplugged.
- Event Type - Main Power Off
- Event Code - Main Power Off Event Code (Keyword) 10 Character Max.
- Event Name - Full name of the Event you are creating.
- Schedule Type - Schedule type can be set to two different settings. You can monitor 24 hours a day (default) or you can create your own schedule to monitor this event. For example, only Mon-Fri and only from 8am to 5pm. You can customize this to fit your needs. This can be changed later.
- Individual email per Vehicle - can be checked if you wish to get an email for each vehicle instead of having them all grouped in a single email notification.
After clicking OK, move on to modify the Notifications and Devices Tabs.
Towing Event
Towing event is used to check if a vehicle is moving without the Ignition being turned ON. The system will check for changing coordinates and check if the engine is on or off. If the engine is on, then this is considered a valid moving event. However, if the ignition is off and the coordinates are changing, then the vehicle is put in Towing mode. Should this happen, you will get a notification.
- Event Type - Towing
- Event Code - Towing Event Code (Keyword) 10 Character Max.
- Event Name - Full name of the Event you are creating.
- Schedule Type - Schedule type can be set to two different settings. You can monitor 24 hours a day (default) or you can create your own schedule to monitor this event. For example, only Mon-Fri and only from 8am to 5pm. You can customize this to fit your needs. This can be changed later.
- Individual email per Vehicle - can be checked if you wish to get an email for each vehicle instead of having them all grouped in a single email notification.
After clicking OK, move on to modify the Notifications and Devices Tabs.
Driver Behavior Event
Driver Behavior Event is used to monitor how your drivers behave while en route. This event is used to monitor Hard Acceleration, Hard Braking and Hard Turns.
- Event Type - Driver Behavior
- Event Code - Towing Event Code (Keyword) 10 Character Max.
- Event Name - Full name of the Event you are creating.
- Schedule Type - Schedule type can be set to two different settings. You can monitor 24 hours a day (default) or you can create your own schedule to monitor this event. For example, only Mon-Fri and only from 8am to 5pm. You can customize this to fit your needs. This can be changed later.
- Individual email per Vehicle - can be checked if you wish to get an email for each vehicle instead of having them all grouped in a single email notification.
- Behavior - Will modify the intensity of each field. These are listed as:
- Moderate - Allows for moderate pressure and speed.
- Mild - A little more lenient for driver behavior.
- Strict - A much stricter profile to monitor.
After clicking OK, move on to modify the Notifications and Devices Tabs.
OBDII Unit Events
As mention before, the LMU3035 (Plug-and-go) units are capable of retrieving OBDII Data if the Vehicle mfg allows it. We will know if this data is available through the VBUS Report. You may view this data in Device Maintenance.
* Low Fuel
* Low Battery Voltage
* MIL Active
* ABS Light Active while Driving
* Engine Oil Temp High
* Coolant Temp High
* Seat belt Not Fastened
* Engine Oil Pressure High
These events are set up as all others.
RemoteView
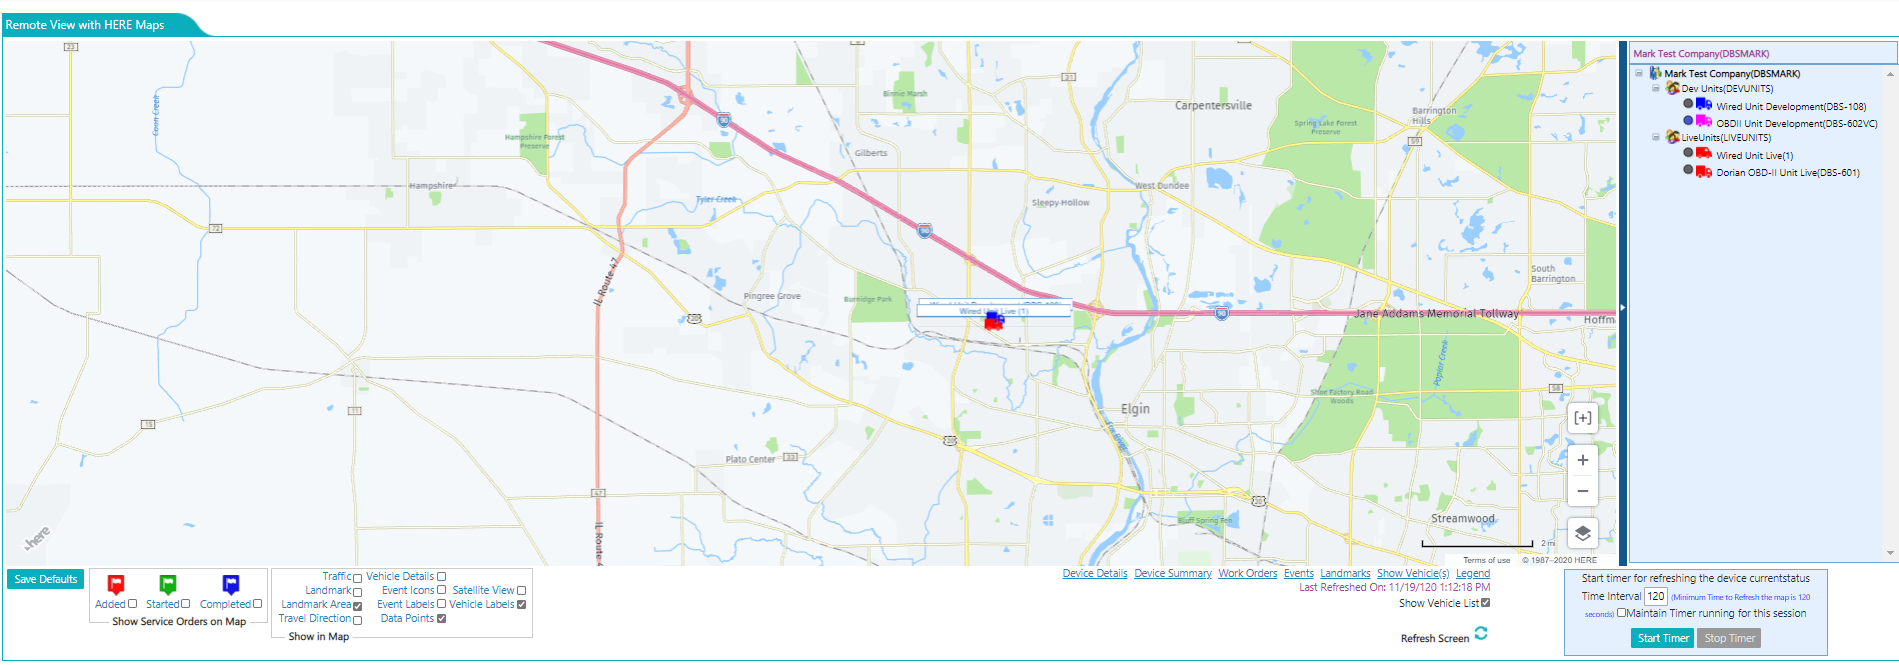
The RemoteView screen is used to track and monitor your vehicles in a map. Allowing you to look at the vehicle’s data through a map. You can look at current location, vehicle activity for the day, yesterday and any desired date range. You can also look at created event locations.
You will have an interactive map on your left and a Vehicle/Group list on your right. The Map will show you all the vehicles that belong to your company. They are listed by the name of your company. Next, listed by groups you have created. Lastly, the vehicles that belong to each group. Vehicle List/Groups/Vehicles
Each vehicle will be shown using the icon you selected back in Device Maintenance. Changing icons will be useful to identify trucks easily on the map. You will find that each vehicle also has a colored icon next to it that looks like Each color defines the status of the vehicle.
If you would like to view all trucks, simply click on the Company name and select Company Current Status. This will show you all the trucks that belong to the company.
If you would only like to view a specific groups, then click on desired group, and click on Group Current Status. This view will only show you vehicles that belong to that group.
If you only want to view the location of one vehicle, then click on your vehicle name and click on Current Status. The view will change to show the selected vehicle.
Zoom Control on RemoteView
You can zoom in and out of the map using different shortcuts. The most efficient way is to use your mouse scroll.
Back To Top
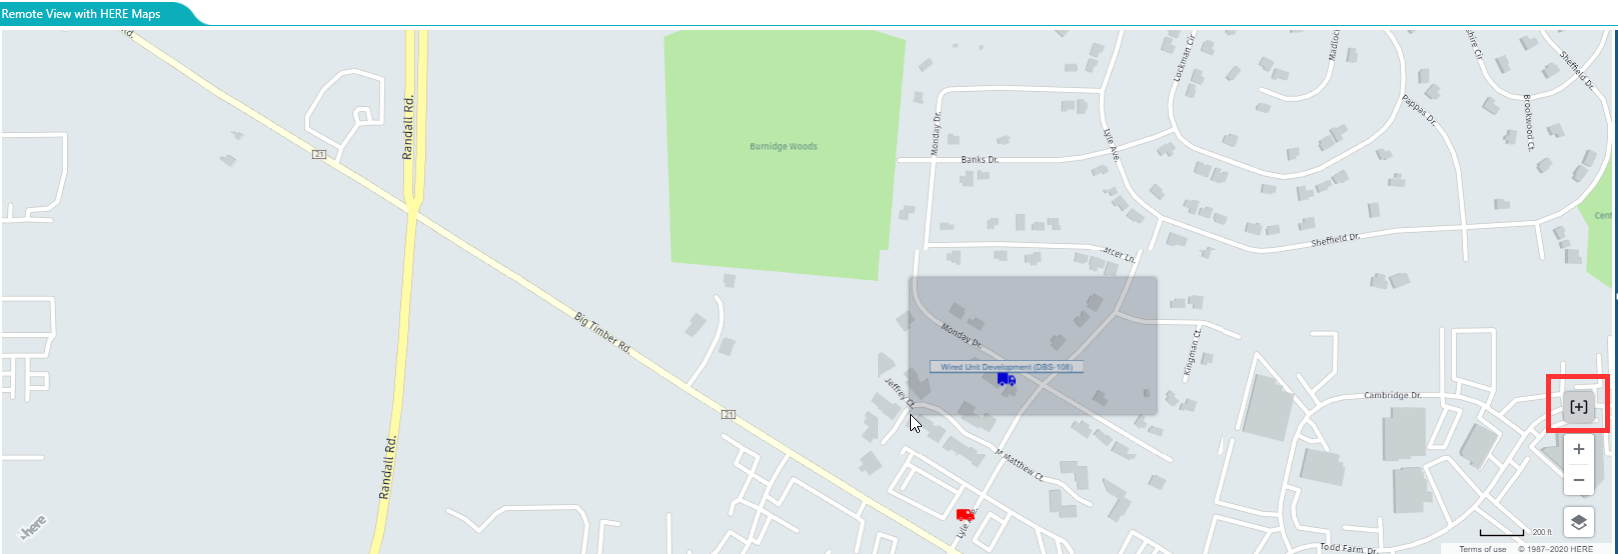
Scroll up to Zoom In and scroll down to Zoom Out. Zoom percentage is shown at the bottom of the screen. You may also use the + and – Icons on the map. You can also use the [+] sign at the bottom right corner of your map.
Clicking on this [+] will highlight the icon and allow you to select an area in the map and automatically zoom in. Click and drag your selection.
The map will zoom into your selection.
You will not be able to move the map while the [+] is highlighted. Click [+] to enable movement of the map again. The [+] will no longer be highlighted.
Map Options
You can set your map to show other information vital to your company.
Traffic –Will show you current traffic status.
Landmark- Will show the landmarks you have created.
Landmark Radius – Will show you the geo fence you set for your landmarks.
Travel Direction – Used when looking at routes will show you the technicians travel direction for easier navigation.
Event Icons – Will let you view icons on certain events that have occurred.
Event Labels – Will show the labels for each event that occurs.
Data Points - Will let you toggle between showing data points on the map and removing them.
You have other options available on RemoteView, You can refresh the data on the map by clicking the button. Or you can also set a timer interval to automatically refresh the screen.
These options can be save per user by clicking the Save Default button.
The other options are as follows:
Device Details –Will show you details about the device.
Device Summary – Used when looking at a technician’s route to show each data point in text format.
Work Orders – Available if you have Garmin integration. Will show the work orders sent to the tech as well as the status.
Events - Will show a list of the events that have occurred for the current day.
Landmarks – Will display a list of all the landmarks you have created.
Show Vehicle(s) – Will center and zoom in on the last selected group or device on the map.
Legend – Will display a legend for the icons displayed on the Map.
To Zoom to a Selected Area – Click on [+] in the bottom right corner of the map. When the [+] is highlighted - This will allow you to create a zoom area by dragging your mouse, for easier zoom on a specific area
*NOTE - You will not be able to move the map to a different area until you click the [+] again so it is not highlighted.
Viewing Vehicle Information
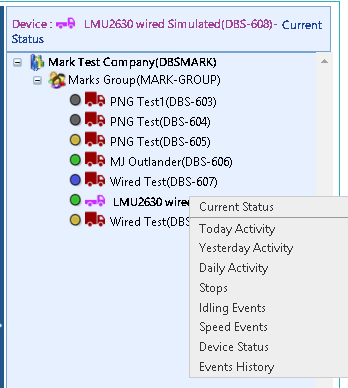
You have several options for displaying vehicle information. When you click on a vehicle, you will be presented with several options. We will discuss each options in full detail.
Current Status – Will zoom and center on the vehicle’s current location.
Today’s Activity – Will display the activity for the current day. It will map out the route the vehicle has traveled for the day.
Yesterday’s Activity – Will display the activity for yesterday. It will map out the route the vehicle has traveled for yesterday.
Daily Activity – Will allow you to select a date range of information you would like to view. For example, if you want to view a specific day last week, or last month.
Stops – Will display the route and any stops that the vehicle has made for a selected date range.
Idling Events – Will display any Idling events that occurred during selected date range. Only if the vehicle has an idling event created.
Speed Events – Will display any Speed events that occurred during selected date range. Only if the vehicle has a speeding event created.
Device Status – Will display vital information for the device.
Events History – Will allow you to select any events you have created and display any events that have occurred for the selected date range.
Today’s Activity
Today’s activity is used to map out the route the device has taken for the current day. When running this report, you may have a significant loading time. The longer the route, the longer it will take to load. The route will be drawn on the map to show where the vehicle started and it’s most current location.
As you can see in this example, I have mapped the technician’s route for today. Each small dot on the route is called a data point. Each data point record the activity at that location. Data points are marked every 2 minutes. Clicking on a data point will give you more information.
While this can be useful to you, you may want some more information. Some more text to show you data of each data point. We can use the link “DEVICE SUMMARY” to get more information.
This will display a pop up window showing you the direction of travel from start to current status, from top to bottom. If you are interested in a specific data point her, you can click on VIEW and it will show the location on the map.
You can also check to see if the vehicle has been close to any of your assigned landmarks. You can do this by going to the area labeled Show in Map. Select Landmarks and it will display on the map.
You can also select travel direction if the route is not very clear.
Yesterday’s Activity
Will give you the activity for yesterday. Same as Today’s activity, all the same options are available, only the date changes.
Daily Activity
Daily Activity is used to map out the route of any specified date range. Same as Today’s and Yesterday’s activity, but allowing you to select other past dates.
Stops
Stops is used to see where the technician has stopped for the day. A criteria selector will be shown to specify your criteria. Date range, time range and also specific length of the stops. For example, I can select the system to show me stops that are longer than 3 minutes but less than 99999 minutes.
Idling/Speeding Events
Idling and Speed Events will show you any idling and speed events. However, this option is only available if you have created an Idling Event or Speeding Event in the Events Sections that we reviewed earlier. You will be presented with a Criteria Selector to choose your own date and time range.
Device Status
Device Status is used to review data of the device. It will center and zoom on the vehicle and show data on the right.
Events History
Events History will show you any events you choose. However, this option is only available for the Event you created in the Events Sections that we reviewed earlier. You will be presented with a Criteria Selector to choose your own date and time range. You will also be able to check the events you want to see.
Tech Service Orders
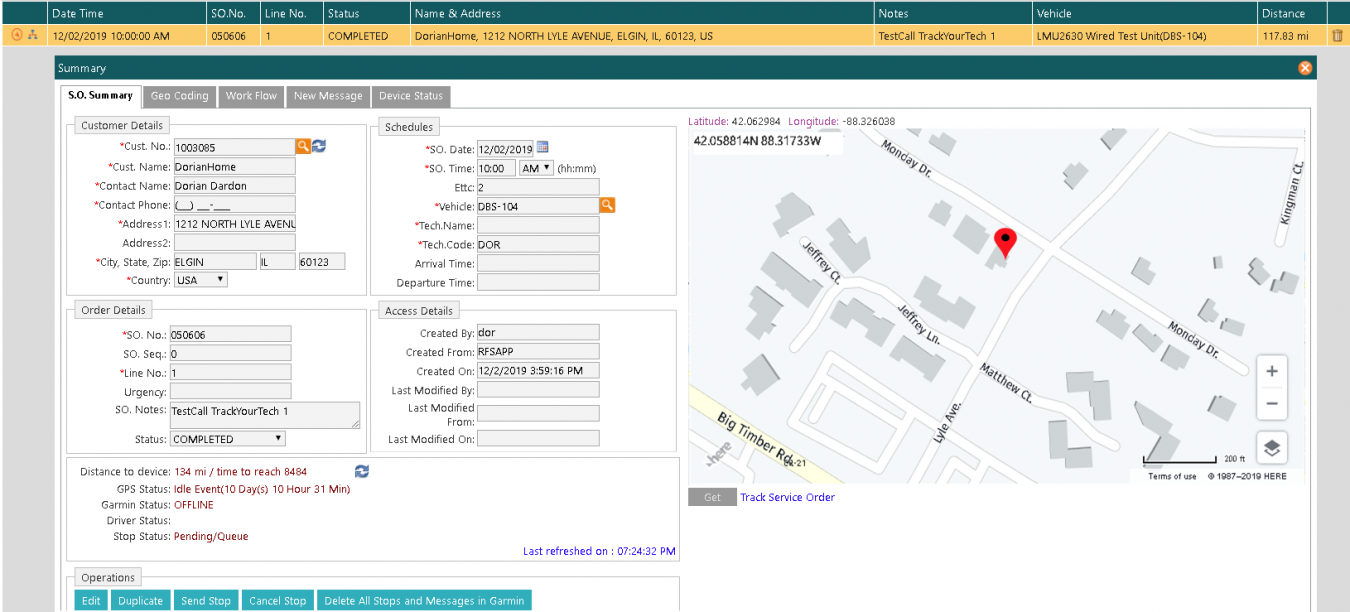
Tech Service Orders will display all the calls that have been sent to your GPS devices. Each time a call is notified or set to Traveling status, the call is automatically sent to the device. If you have a Garmin, the call will display on the Garmin, if the device does not have Garmin interface, a geofence is created at the location of the service order, to trigger arrival and departure of the job site.
This page will display the information of the call as shown below:
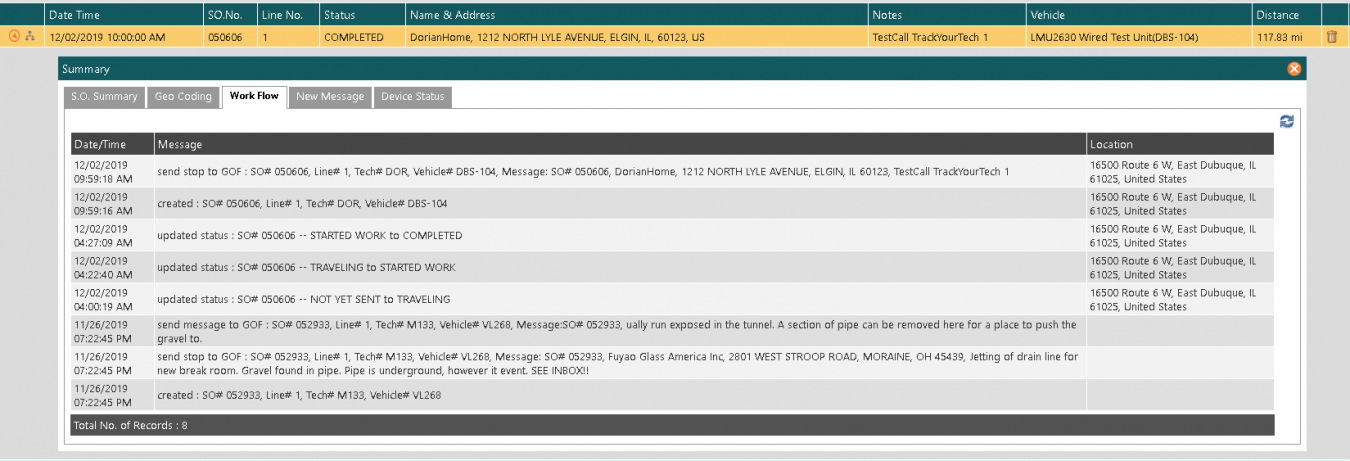
You can also see the entire workflow of that call as shown below:
Messages
If you have a Garmin interface, all message transactions will be displayed here.
Driver Behavior Dashboard
Introducing the newest feature of RemoteFieldView. Driver Behavior Dashboard is where you can monitor and review driver behaviors while driving business vehicles. This page will summarize all driving information in a convenient location for your analysis.
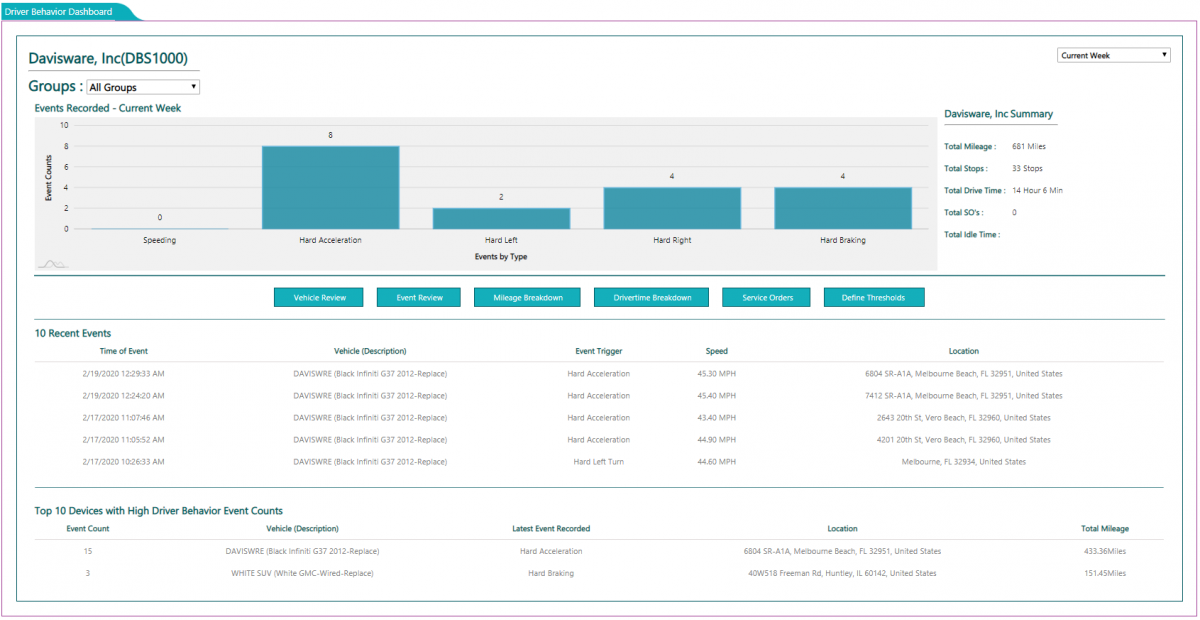
The main dashboard will give you an overall quick view of the all events recorded and the most recent Driver Behavior events recorded.
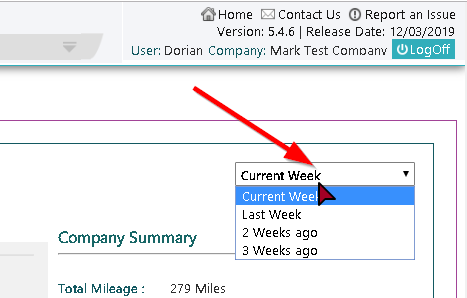
In this page, as all others in this module, you will shown the data for the current week. However, each page will allow you to select up to a month worth of data. The selection of the week is on the top right corner of the pages. Below you will see the Weekly Selection Menu. Simply select the desired week and the page will load automatically.
The dashboard will be broken down in to 3 Sections:
* Overall Company Summary
* 10 Recent Events
* Top 10 Devices with High Driver Behavior Event Counts
The Overall Company Summary Section will display the overall company events for all devices.
- This Section will display a graph off all the recorded events for the current week selection.
- The summary will be displayed with information of all devices. This includes:
- Total Mileage - Total Mileage of ALL vehicles for the selected week
- Total Stops - Total Stops of ALL vehicles for the selected week
- Total Drive Time - Total Drive time of ALL vehicles for the selected week
- Total SO's - Total Service Orders of ALL vehicles for the selected week
- Total Idle Time - Total Idle time of ALL vehicles for the selected week
The 10 Recent Events Section will display the 10 most recent events that have occurred for the current week. This will reload as the Driver Behavior Dashboard is refreshed.
The Top 10 Devices with High Driver Behavior Event Counts Section will display the top 10 devices with the most Events recorded. This will reload as the Driver Behavior Dashboard is refreshed.
Driver Behavior Buttons
Vehicle Review
Vehicle Review is used to drill down to each device.
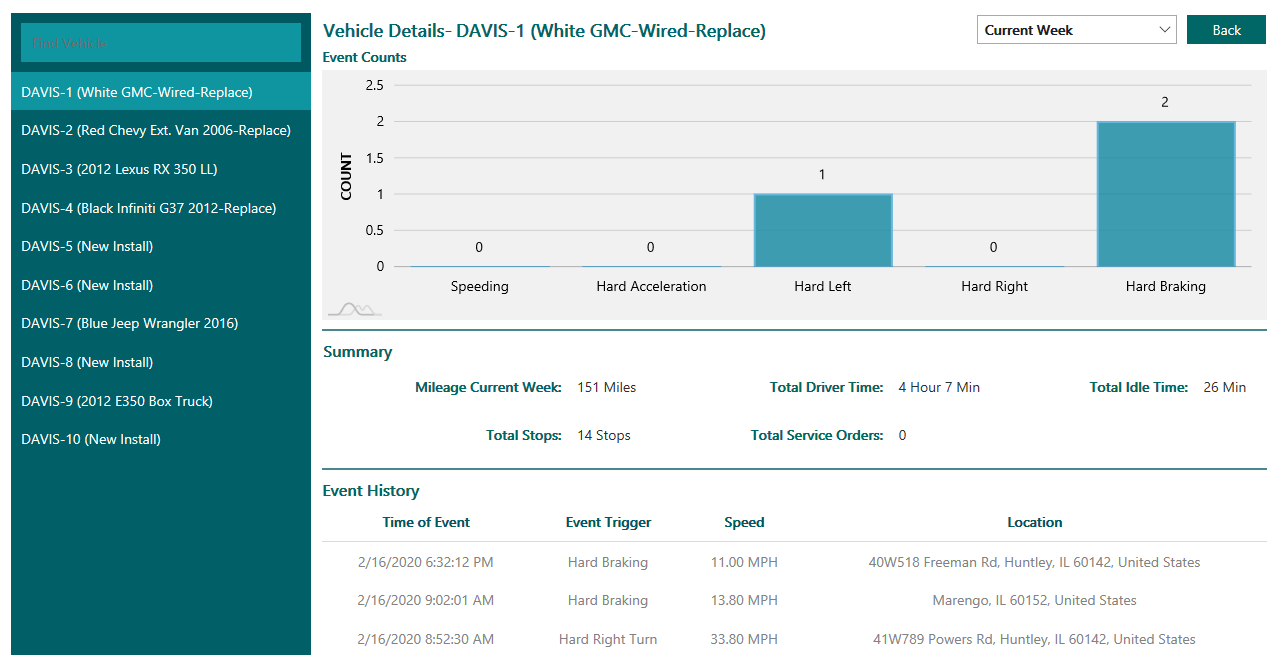
In this page you will be able to view Events recorded by individual devices. In the left panel you will be able to see all the devices for your company. You can use the search in this column to narrow down your result.
When you select a vehicle, the page will load the events for the specific device selection. By default the data shown will be for the current week. You can change the week selection by using the top right menu to select a different week. This page will show:
* Event Counts - The Event Counts Graph will display the events recorder for the selected Device and Week.
* Summary - The Summary section will display the Total Mileage, Total Driver Time, Total Idle Time, Total Stops, Total Service Orders for the selected Device and Week.
* Event History - The Event History section will display ALL events for the selected Device and Week.
Event Review
Event Review is used to look at all the events for the company.
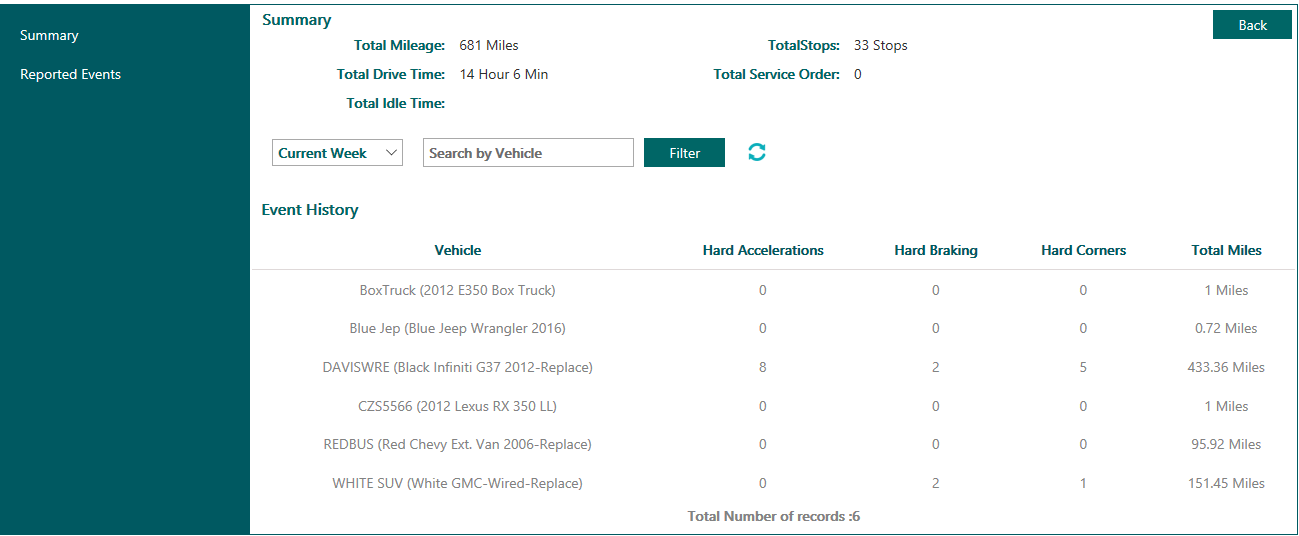
In this page you will be able to view Events recorded for the entire company. The page is divided into two sections. The Summary and Reported Events"
In the Summary Section, you will get the summary of all devices. This will include the Total Mileage, Total Driver Time, Total Idle Time, Total Stops, Total Service Orders for the selected Device and Week. See image below:
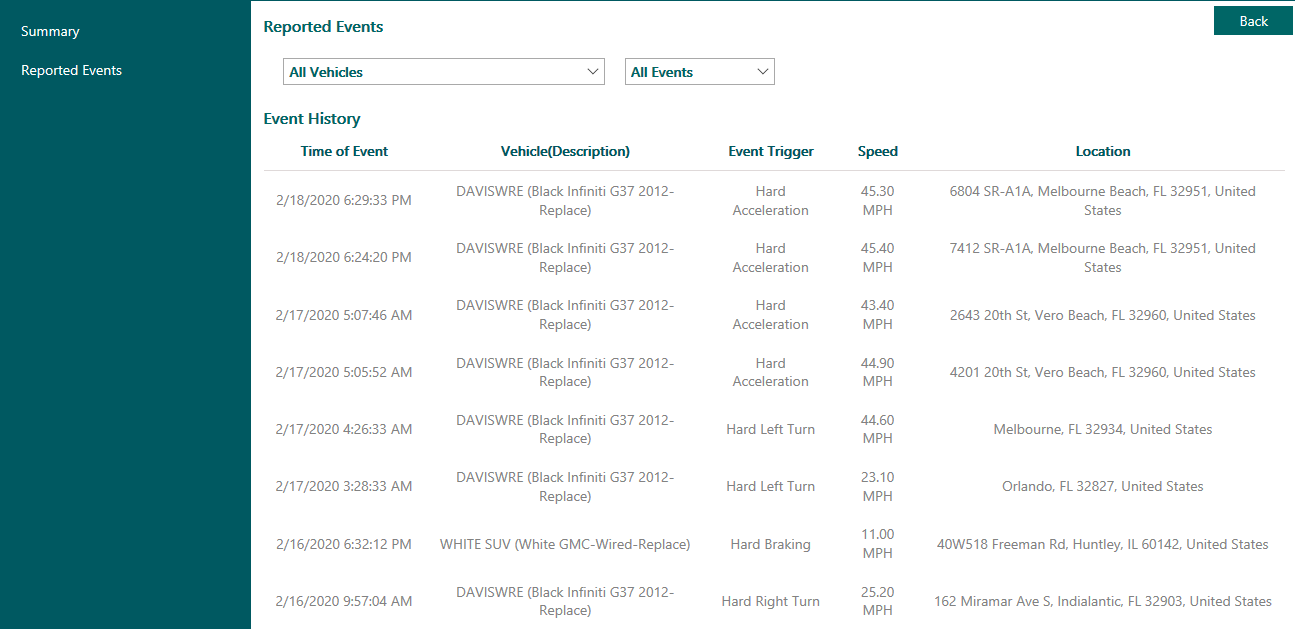
In the Reported Events Section, you will see ALL events for the company. You will be able to filter your results by Device or by Event Types.
By selecting a Device, the program will display all Events. Afterwards, you can filter by the event type you are looking for, such as, Speeding, Hard Acceleration, Braking, Left Turn, Right Turn.
Mileage Breakdown
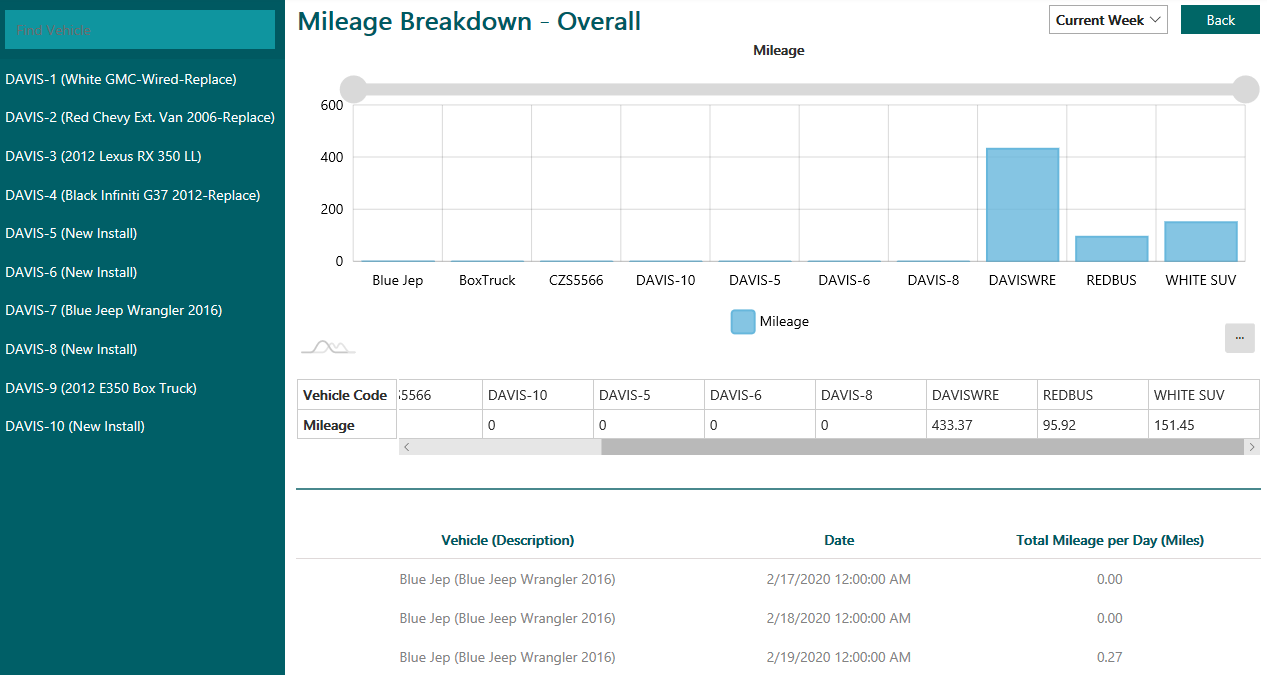
The default page for Mileage Breakdown will show you the mileage information for the entire company.
The graph will show the mileage of all the devices for the selected week.
The left section will allow you to select a specific device. Simple search for the device and the page will show you mileage breakdowns per day of the selected week.
The breakdown will separate the mileages per day.
Drivetime Breakdown
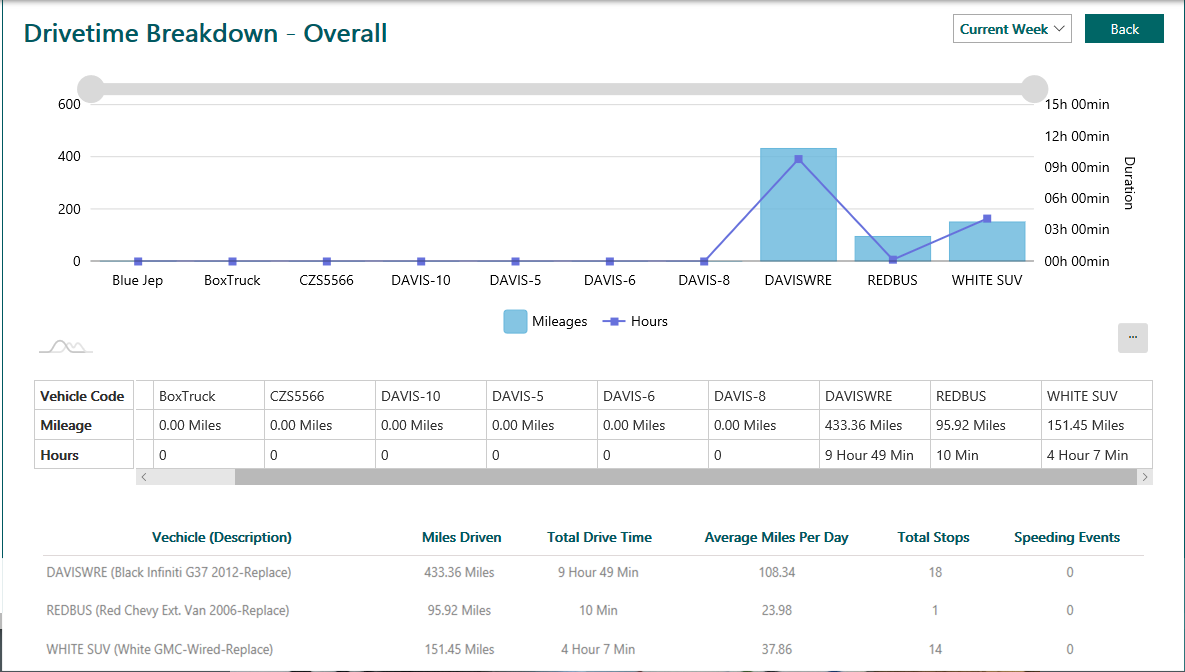
Drivetime Breakdown will also show the mileages, but in addition you will also receive the total drive time for each vehicle. This page will aid in showing you how long drivers are on the road to help you analyze how much the vehicle is driven per week.
In addition to this, the breakdown will also display the Average (Per day) driven, Total Stops and Speeding events. (Speeding events will only show if the device is part of a Speeding Event) See Section: Setting Up Speeding Events
Service Orders
Service Orders will take you to the Tech Service Orders Section to review the SO's for your company. See Section Tech Service Orders for more information regarding this section.
Define Driver Behavior Thresholds
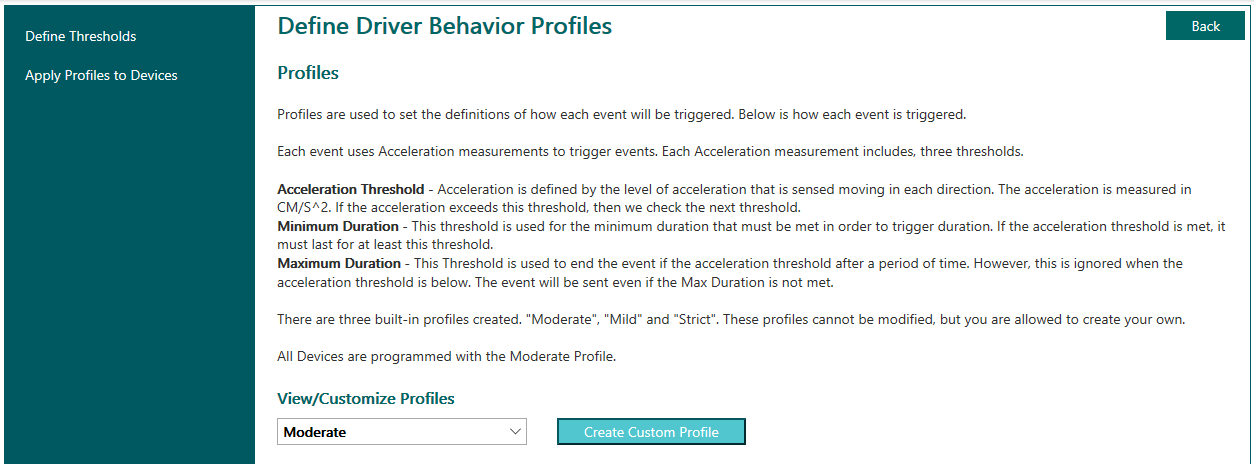
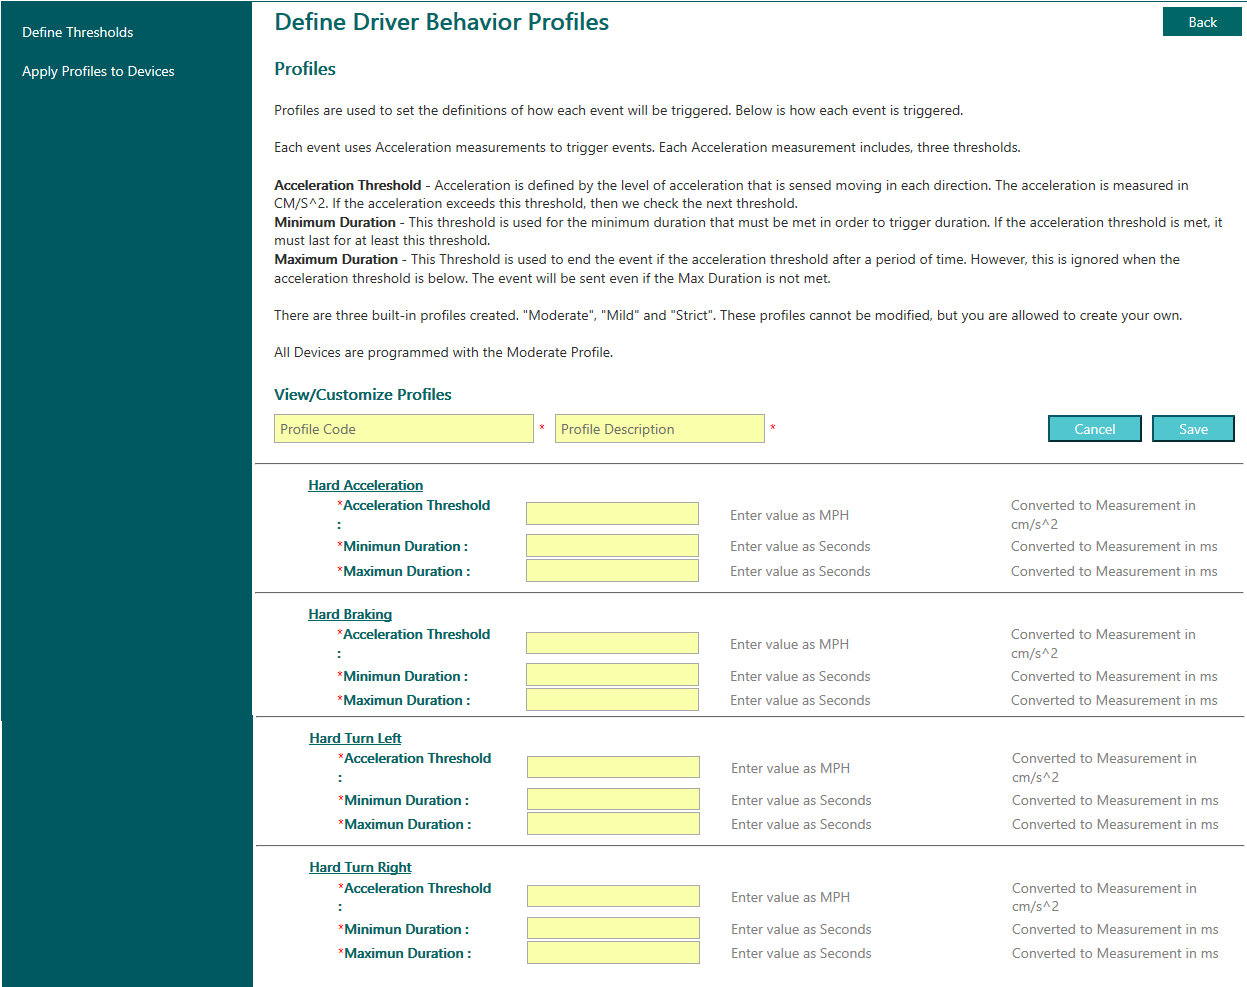
Driver Behavior Thresholds are monitored using acceleration measurements. We monitor Hard Acceleration, Hard Braking, Hard Left Turns, and Hard Right Turns. The default setting within the GPS devices are set to Moderate.
These settings can be modified to Mild, Moderate, or Strict. You can also create your own custom thresholds for each vehicle, a group of vehicles, or your whole fleet.
Below are the default measurements for the Moderate Threshold chosen from the drop down menu.
You can create your own threshold by entering your Acceleration Threshold in MPH, the Minimum duration the vehicle has to exceed the set threshold, and the Maximum duration that will end the event.
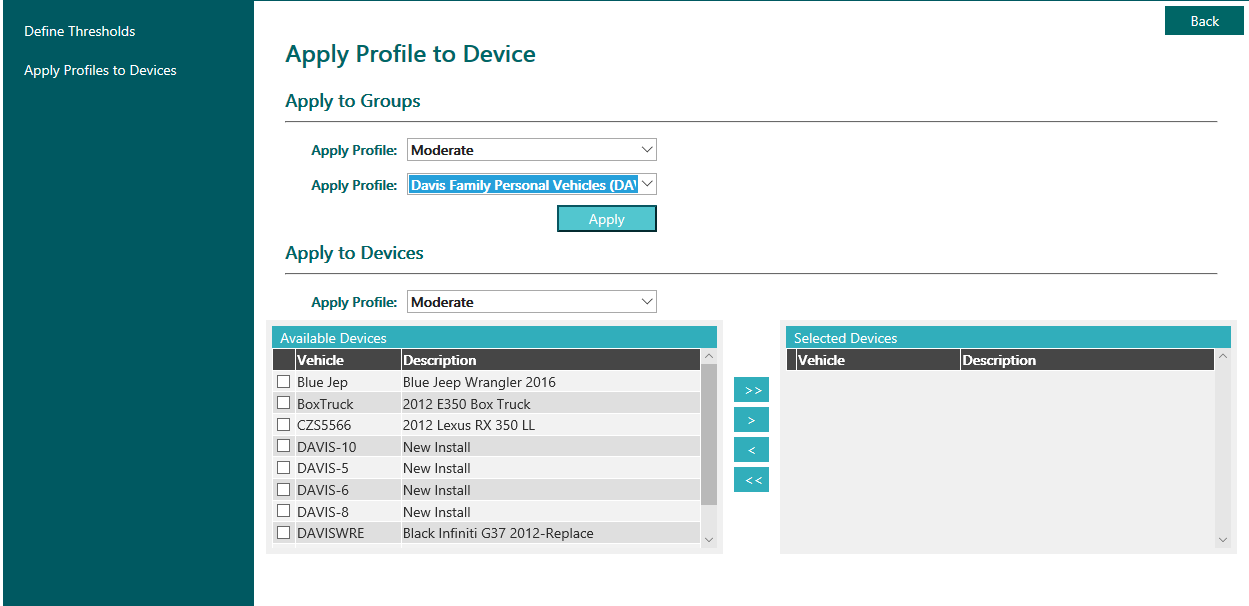
To apply a given threshold to a group of vehicles which is predetermined in Group Maintenance, chose from the Apply Profile drop down menu.
You can also apply a Threshold Profile to specific vehicles by checking the boxes next to each vehicle you would like to add to the Profile and clicking on the arrow to move them from Available to Selected Devices.
This concludes the Daily Processing section

