Administration Menu
Contents
ADMINISTRATION MENU
The administration menu is used to configure users, user/menu access, divisions, device details, and groups. These configurations will give you full control over who can access different areas of RemoteFieldView, what devices they can see, and who can receive notifications of events.
This area is reserved for administrators who are allowed to create/delete users, and restrict access to specific areas. By default, the first user created for your company is a full administrator. We recommend that you create users for everyone that will access the software.
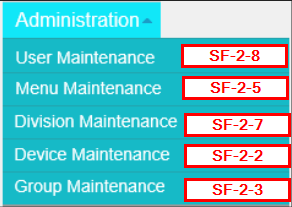
The Administration menu consists of 5 Sections covered in detail below.
User Maintenance
User Maintenance is used to create separate logins for all of your company users. We recommend that employees using RemoteFieldView have their own login, for security and for Event Notifications, a section that will be covered in the Events section of our guide.
You may create as many users as you wish.
In this page, you can filter your list to find your users faster. Use the search fields to narrow down your search by specific fields.
Add users by clicking the ADD NEW USER button on the top right hand corner.
We suggest that each person accessing RFV has their own user id created for them. This is used to track when someone modifies anything in RFV, keeping a history of when users login and most importantly, it serves the purpose of sending email notifications to specific users. We will cover this in the Events section of the guide.
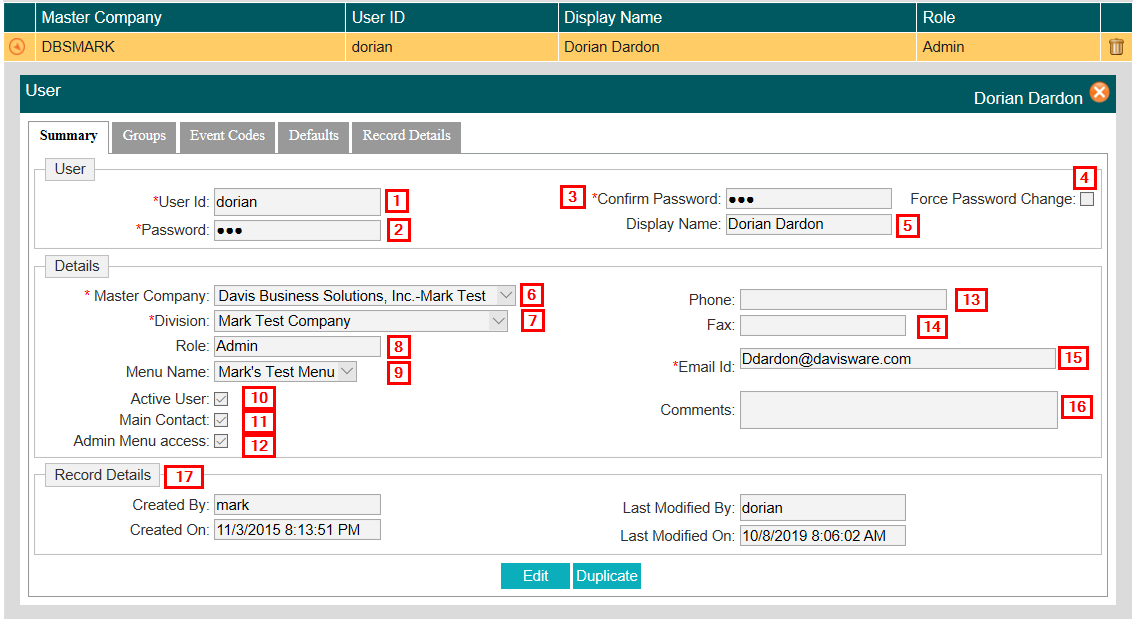
- Create User ID - This is a short user ID name. Recommend to use FirstnameLastinitial or FirstnameinitialLastName. (Ex. DorianD or Ddardon)
- Assign Password
- Confirm Password
- Force Password Change - Allows you to give the user the opportunity to change their password on first login, for a more secure password environment.
- Display Name - Name that will appear on the website after login.
- Master Company - Your Company Name. Only one option will be shown, unless your company is linked to another.
- Division - The Division to the Master Company, depending on setup, you should only see one Division.
- Role - Role of this User.
- Menu Name - Menu Assigned to User. You may leave the Admin Menu as a default. We will cover Menus in a section below.
- Active User - This is used to activate and deactivate users.
- Main Contact - Normally reserved for original account but can be changed if need be.
- Admin Menu Access - Used to remove administration Menu if user does not require it.
- Phone - Not required, but can be populated for your own reference.
- Fax - Not required, but can be populated for your own reference.
- Email ID - Required to receive notifications from Events.
- Comments - Any comment regarding this user.
- Record Details - Area showing when the record was created or Modified as well as users who created or modified the record.
Click OK to save your new user.
Next, we need to assign the user Groups. However, we will need to understand how groups are configured and the limitations so that we can create them properly. We suggest that you read the section on Groups, before we assign groups.
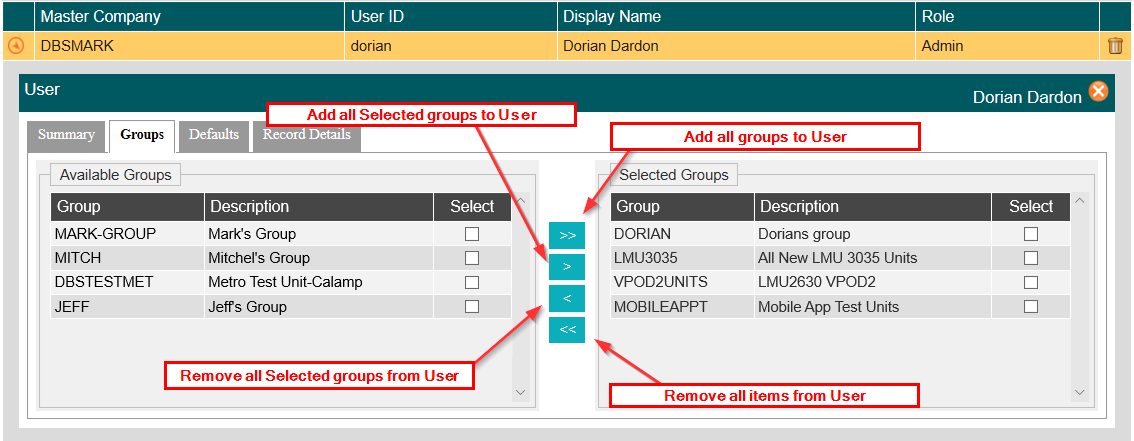
The user is now able to login, but they will be unable to see any vehicles if they do not have groups assigned to them. To assign our user groups, click on the GROUPS Tab.
Group Maintenance
Group Maintenance allows you to create groups that divide your vehicles for better organization by labor groups, or locations. You are allowed to create as many groups as you would like.
It is however, important to note the following:
A device can only be part of ONE group. If the Device is part of Group A, then it is not available to reside in any other groups. You must take note of this when deciding how to organize groups.
Like most sections in RFV, you can use the search fields to narrow down a list when looking for specific groups.
To create a new group, simply click on the Add New Group icon on the top right hand side of the screen.
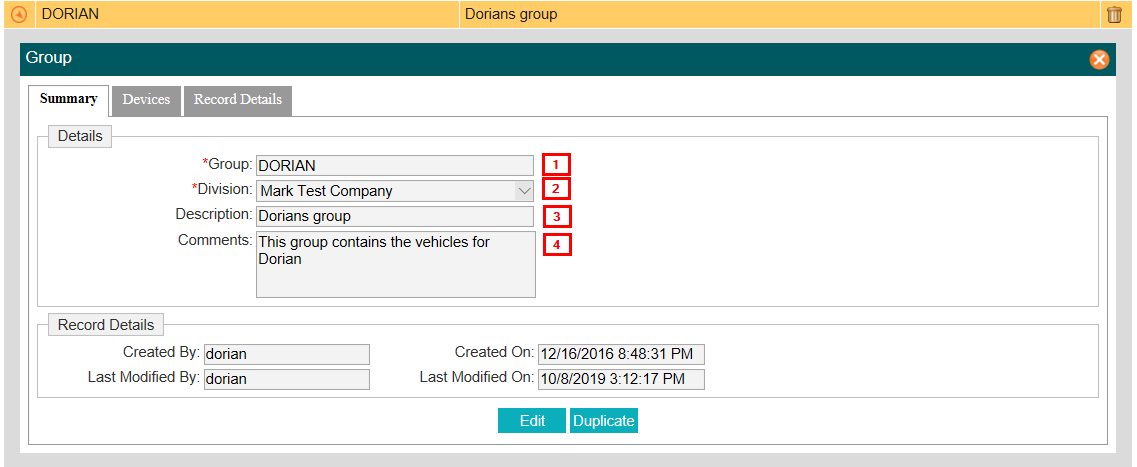
When creating a new group, the first screen you will see is the SUMMARY SCREEN.
- Group - Name of the Group
- Division - Division that this group belongs to.
- Description - Description of the group.
- Comments - Any comments you would like to give to this group.
The section listed as Record Details, will show you when and who created the group as well as any user who may have modified the groups.
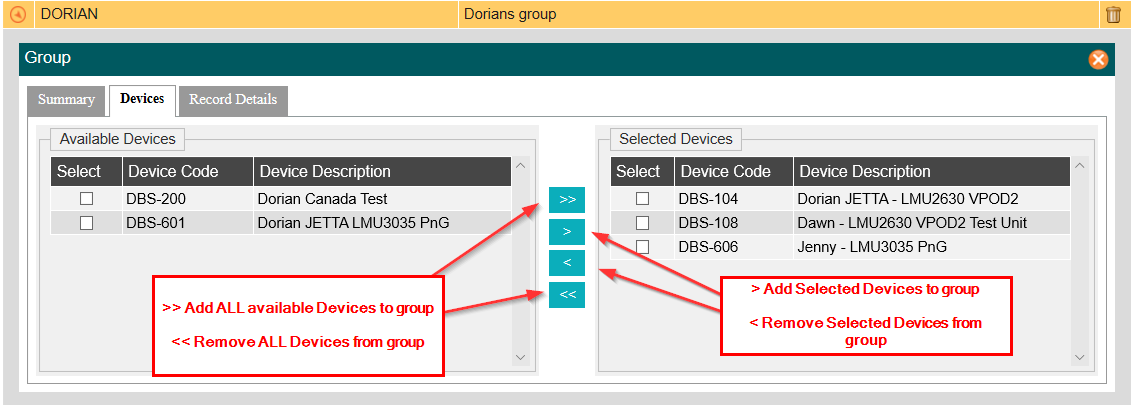
In order to add devices to your group, you will need to add the devices individually to each group. The devices listed under AVAILABLE DEVICES are the devices that do not belong to a group and are available to join your group. If you do not see a device in the Available section, it is because it is already part of another group.
You may move these devices by using the arrow keys placed between the "Available Devices" and "Selected Devices"
Available Devices are the devices that are not part of a group and ready to be moved into groups. Selected Devices are the vehicles that are part of the selected group.
When you first receive your devices, they will all belong to one group. You can remove them all so that they can become available to other groups.
Simply click on the X Icon to close the group when done. Your groups are now available to assign to your users respectively.
Back To Top
Device Maintenance
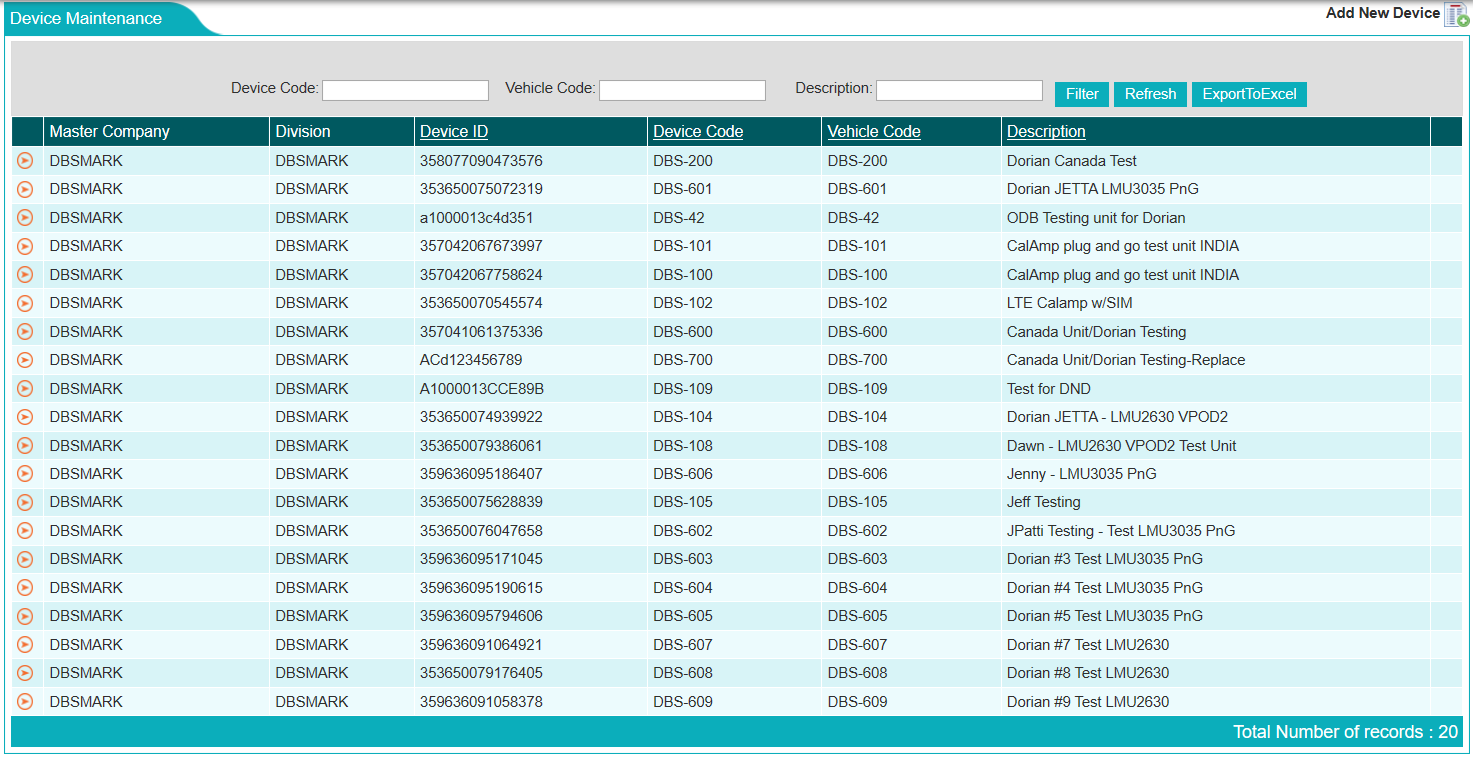
Device Maintenance will be used to customize and rename vehicles to your naming convention. You can edit the name of the device to match your vehicle names/numbers, assign trucks to drivers, add descriptions and add comments. When opening the Device Maintenance Screen, you should see the following page:
Like most sections in RFV, you can use the search fields to narrow down you list when looking for specific devices.
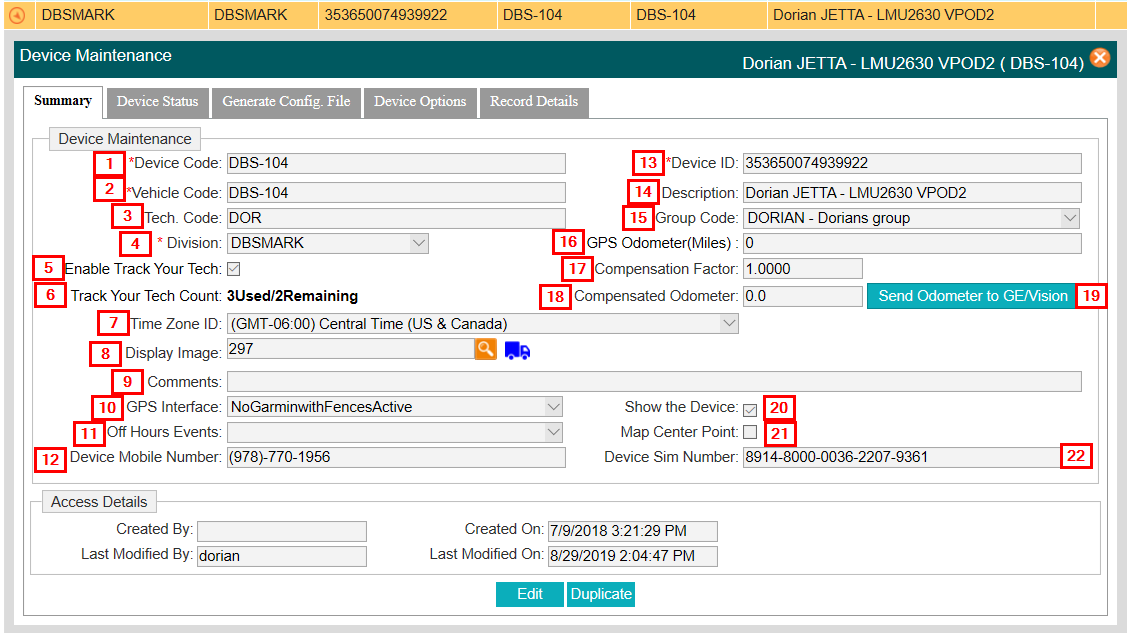
You may click on each device to expand the summary of each device, and customize your device details. This, as with any screen is done by click on the Orange Expansion Icon.
You can click on Edit to edit each device. Below, we will cover each field and what it means.
- Device Code - The Device Code assigned to the GPS Tracker. This is non-editable.
- Vehicle Code - This field serves as the identifier name for your company. You may edit this field to fit your company's need. This will show in the Dashboard.
- Tech Code - You may edit this to be the same as GE/Vision/Wintac Technician Codes. Not required.
- Division - The division that this device belongs to.
- Enable Track Your Tech - Available only when the license has been purchased. Enabled TrackYourTech Feature for this device.
- TrackyourTech Count - Provides the seat count for the feature.
- Time Zone ID - Change the Time Zone for this specific Device. By default, all devices will have the timezone designated for the company.
- Display Image - Allows you to change the icon for that Vehicle and how it will display on the Map.
- Comments
- GPS Interface - By default, this will be set to NoGarminwithFencesActive. It may be changed to Garmin if Garmin integration is required.
- Off Hours Events - Select from Off-Hours Event created in the Events Section.
- Device Mobile Number - Phone number assigned to this Device.
- Device ID - The MEID Number of that Device. Non-Editable.
- Description - Description of the Device. This will show in the Dashboard.
- Group Code - The Groups that this device belongs to.
- GPS Odometer - Input the Odometer of the vehicle so that we may continue to accrue miles as the device is in motion.
- Compensation Factor - Used to compensate the odometer, when it is not correct. See Note below.
- Compensated Odometer - Shows the total Odometer value after compensation.
- Send Odometer to GE/Vision/Wintac - Will send the current odometer value to GE/Vision/Wintac
- Show the Device - Allows you to decide if the device should be shown in the maps.
- Map Center Point - Will allow the mapping software the center the location in a map if needed.
- Device Sim Number - The SIM Number of that Device. Non-Editable.
- Odometer Note - We cannot get real odometer values form the vehicles, so we calculate this via speed, distance traveled and time. We recommend that the mileages are update every 2-3 months to make sure that you have the proper odometer values.
If you should need a list of your devices in Excel format, you can also export the list by clicking on the ExportToExcel button.
Back To Top
Menu Maintenance
Menu Maintenance is how we can create levels of security for your users. For example, not all your users should have access to your administration menu. Menu maintenance allows you to create Menu Templates that remove entire Menus or Menu Options.
When opening the Menu Maintenance Screen, you should see the following page:
Like most sections in RFV, you can use the search fields to narrow down your list when looking for specific Menus.
Add a new Menu by clicking on the Add New Menu button on the top right-hand corner.
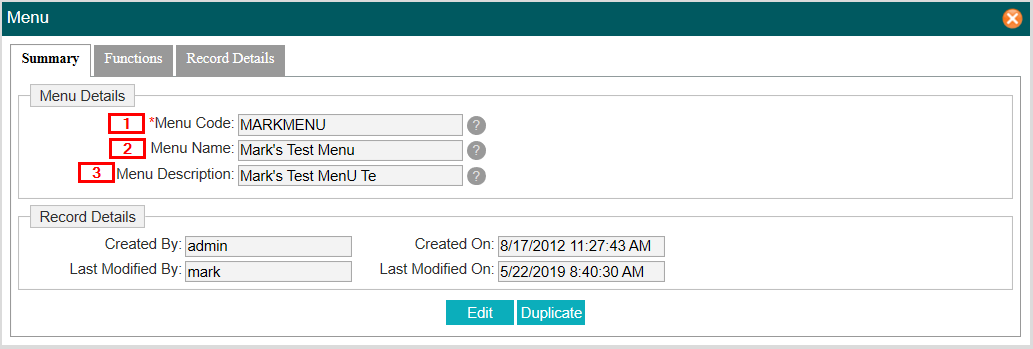
These fields are to be filled in:
- Menu Code - A shortname for this Menu. Required.
- Menu Name - Long Name of the Menu. Required.
- Menu Description - A description of this Menu. Optional.
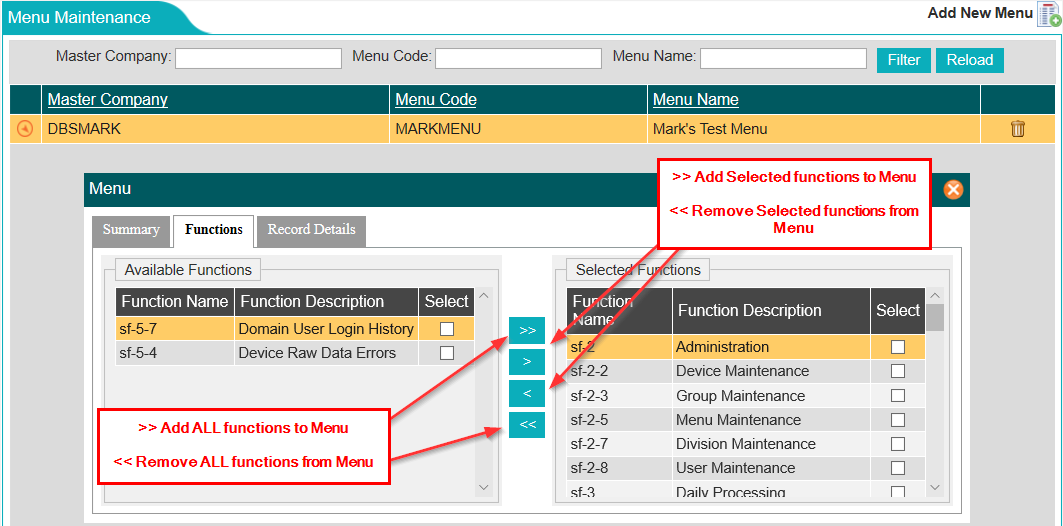
Next we need to go to the FUNCTIONS Tab.
Your available Menu Functions are on the Left, while the Menu Functions that belong to the Menu are on the right.
Creating the Menu functions can be a little confusing. In order to help you take advantage of our powerful menu tools, and create functional menus the following will explain how Menus are created. There are two levels of Menu Functions.
The first Menu Function will be these Menu Functions. They will be referred to as SF-# (Each Menu has a # assigned)
The second Menu Function is listed as SF-#-# where the first # is the Initial Menu. The second # is the Menu function that falls under the initial Menu Function. For example:
Creating the right menu will allow you to carefully design your menu templates to fit all your users needs.
This concludes the Administration Section. Next, we will move on to the Daily Processing Menu

