Track Your Tech Feature
Contents
Feature Set Overview
Davisware’s “TrackYourTech” service allows companies to provide real-time ETA and location of a technician’s vehicle in relation to the assigned to the active Service Order. Let your customer know when their tech will arrive so they know when to expect the technician to arrive.
- Use RFV location of your Vehicle’s GPS device to send location of their assigned technician
- Use your RFS application to trigger the notification of a technician to your customers
- Send immediate E-mail to your customer contact when your technician sets the status the active Service Order to TRAVELING
- Simple user interface for your customers to track location
- Visual updates every 2 minutes based on GPS location changes
- ETA updates when location updated
- Tracking of vehicle is terminated when technician arrives at location or Job is set to STARTED.
Pre-requisites
This feature requires the following programs:
- GlobalEdge Version 17.4
- Davisware GE E-mail Alert Service
- RemoteField Service (RFS) Mobile Application Version 18.06
- RemoteField View Hardware (GPS Units)
If you have all pre-requisites, then TrackYourTech is ready for set up. Licensing for this product is explained below:
- The RFV Software requires the TrackYourTech feature to be enabled.
- This is enabled by the RFV Administration team after the feature has been purchased.
- Please contact rfvsupport@davisware.com if the feature is not enabled.
- Each device requires a paid license. You are not required to purchase licenses for all devices.
- For example, if you have 10 units, you may only need to purchase 5 licenses, should you only require the feature for 5 devices.
- The feature uses floating licenses. This means the feature can be disabled for Device “1” and applied to Device “2” at any point in time.
- For example, if you have 10 units, you may only need to purchase 5 licenses, should you only require the feature for 5 devices.
- GE/RFV Integration enabled and configured.
- System Utilities → System Setup Menu → System Control Maintenance → Davisware Integration → RFV Details
- Setup Menus → Initial System Setup → Company & Division Maintenance → Additional Info → RFV Integration
- Setup of Vehicles
- Salesperson Vehicle assignment
- GE EMAIL ALERT Service to be installed on Customer Server.
- If this has not been set-up, please contact GEsupport@davisware.com for help on this set up before proceeding.
RFV/GE Setup
In order to use this feature, the RFV/GE team will need to activate the feature from the Administration Control Panel. This is activated once the feature has been purchased and is activated by a license count. The quantity of seats is specified when the feature is activated. If this is already done, the following steps are required.
- In Device Maintenance, you will simply activate the “Enable Track Your Tech” checkbox for the desired Device.
- Below this checkbox, you will see how many devices are used and how many remain.
NOTE: It is important to note that this feature will only work with devices that have the feature enabled. If you have 5 (TrackYourTech) licenses and 10 GPS units, only 5 devices will be allowed to use the TrackYourTech feature.

GE Setup
Create the Notification Rules
In GE, navigate to:
1. Navigate to System Utilites → System Setup Menu → Activities And Notification Maintenance tab
2. Click on the Activity Type Maintenance tab
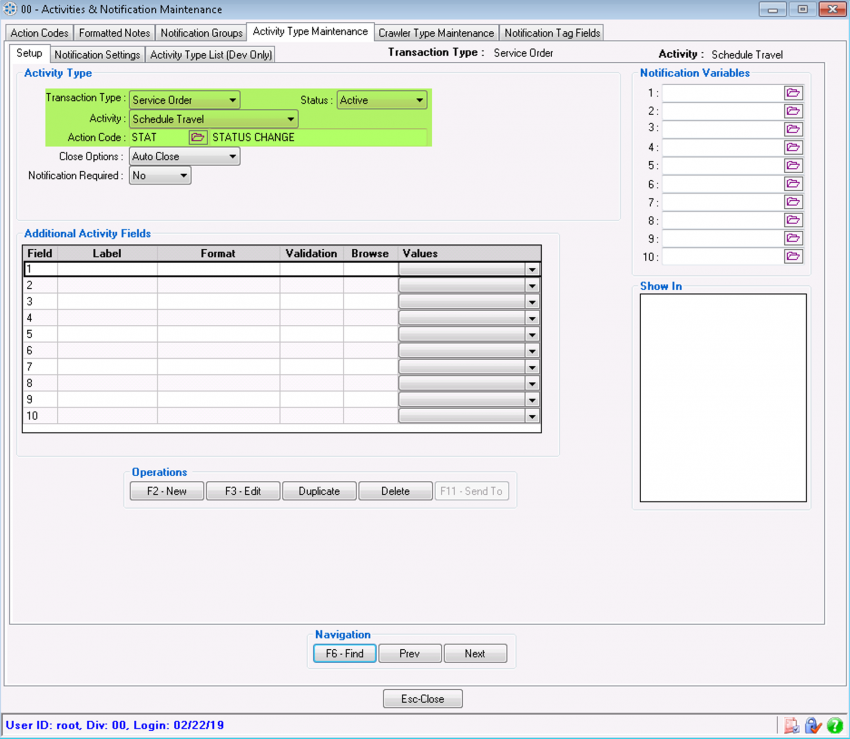
- a. On the Setup tab, we will create the activity.
- b. Click Find(F6) and search for the Action Type – “Service Order” and Activity Action – “Schedule Travel” Once found, select it and click OK(F8)
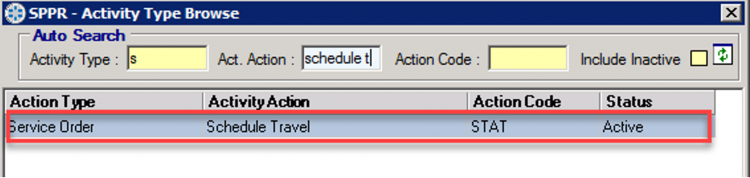
- c. Your screen should look like this:


Create the Notification Email Event
Now, click on the Notification Settings Tab and we will set up the notification for this activity. Click on F2 - New
The following fields are required:
Event – Required to be checked to send the notification when the SO is set to TRAVELING Status
Event Time – Required to be set to Now in order to send notification immediately
Other Contacts or UserID(s) – Required to use specific tag defined by you. This is used to know where to send the notification. We will use the e-mail provided by the tag you select below:

If you want to receive a confirmation of all emails sent, please use the following options:

Send confirmation, Notification Group(s) and Confirmation Email Body to send confirmation to your internal Notification Group. So you can verify the alert was sent.
Create the E-mail Template
Here we will create our e-mail template that will be used to send to the clients.
Email – Required to send email. Set to “Send Email”
SMS – Required to send SMS, if you wish to use SMS, set to “Send SMS”.
Mobile No(s) – Required for sending SMS. You will need to select where we get the mobile number from, using the tags provided.

Close – Set to “Auto Close”
Email Subject – Required to write the Subject line of your email. You can customize this to any subject you want to send. Remember this is generic for all emails sent.
Event Email Body – Required. This is the message that will be sent to your SO Contact. You can select from several tags to add to your message by clicking the Folder Icon.
SMS Message – Required if SMS is to be sent. This is the message that will be sent to the Mobile Contact. You can select from several tags to add to your message by clicking the folder icon. Small messages are recommended for SMS as SMS has a limited amount of characters defined by individual network carriers.

In this example, I have both SMS and Email notifications set up.
Event – Checked for sending the notification when the event is triggered.
Event Time – Set to Now to send notification immediately.
Other Contacts or User ID – Set to <SOEMAIL> so that the email associated to the SO is used.
Email – Set to Send Email
SMS – Set to Send SMS to send SMS
Mobile No(s) – Set to <SOREQUESTMOBILE> to use the mobile number of the contact who requested the SO.
Close – Set to Auto Close so that the activity is closed after sending the notification.
Email Subject – Set to:
<CUSTNAME> - <SOTECHNAME> has begun traveling to your location. Track your Technician
<CUSTNAME> - The name of the customer in the SO
<SOTECHNAME> - The name of the technician that is traveling to the SO
Example will look like this:
POPS PANTRY : DOR has begun traveling to your location. Track your Technician
Email Body – Set to:
<TRACKTECHNICIAN> - URL provided to customer to open the tracking website
<SOTECHNAME> - The name of the technician that is traveling to the customer
<SONO> - The Service Order Number

Example will look like this:

You can select any tags using the folder icon to get the tags placed in the email body
SMS Message – Set to :
<TRACKTECHNICIAN> - URL provided to Customer to open the tracking website
<SOTECHNAME> - The name of the technician that is traveling to the SO
<SONO> - The Service Order Number

Notification Delivery
Your notification is sent based off a time interval. After the status has changed to TRAVELING, the system will look for a setting inside of:
System Utilities → System Setup → System Control Maintenance → System Setup → General Setup → Event Notification Service

In this example above, the service will check every 3 minutes.
NOTE: 3 minutes is the minimum amount.
Customer Notification
Your customer will receive the notification you created when the technician changes the status of the SO to TRAVELING from RFS and has a valid GPS unit.

NOTE: If the Traveling status is not sent, the notification will not be triggered.
Once the customer receives the corresponding URL, they can open it to begin tracking the technician.

Location tracking will end when the technician arrives by breaking the geofence or using RFS to change the status of TRAVELING to STARTED.
The customer will not be able to track the technician after the status is changed to STARTED.

This concludes the portion of TrackYourTech. If you experience any difficulties, please contact us at RFVSupport@davisware.com