Difference between revisions of "Reports Menu"
m (→REPORTS Menu) |
|||
| Line 2: | Line 2: | ||
Reports are used to get information on devices. Each report displays different data. We will discuss each report in detail. | Reports are used to get information on devices. Each report displays different data. We will discuss each report in detail. | ||
<br> | <br> | ||
| − | [[File:ReportMenu.png|frame| | + | [[File:ReportMenu.png|frame|center|Report Menu]]<br> |
| − | |||
Each report will be displayed as a second window. All reports will have the same options. | Each report will be displayed as a second window. All reports will have the same options. | ||
| − | [[File:ReportOptions.png|frame| | + | [[File:ReportOptions.png|frame|center|Common Report Options]]<br> |
| − | |||
# '''Company''' - Select the Company. Not required if you only have one company. | # '''Company''' - Select the Company. Not required if you only have one company. | ||
| Line 16: | Line 14: | ||
<br> | <br> | ||
After you have selected your ranges and devices, you will see another page load. This page will prompt for the report delivery. You will have three options: | After you have selected your ranges and devices, you will see another page load. This page will prompt for the report delivery. You will have three options: | ||
| − | [[File:ReportOptions2.png|frame| | + | [[File:ReportOptions2.png|frame|center|Report View Options]]<br> |
| − | |||
* To Screen - You can see the report on Screen. | * To Screen - You can see the report on Screen. | ||
* To File – Sends report to PDF format and downloads the reports for you. | * To File – Sends report to PDF format and downloads the reports for you. | ||
* To Email - Creates the PDF Document and sends it to desired e-mail address. | * To Email - Creates the PDF Document and sends it to desired e-mail address. | ||
| − | + | <br> | |
===== Activity Summary ===== | ===== Activity Summary ===== | ||
Activity Summary displays a small quick summary of the vehicle’s data. It is not a detailed report, just quick information for selected date ranges. | Activity Summary displays a small quick summary of the vehicle’s data. It is not a detailed report, just quick information for selected date ranges. | ||
| − | [[File:ActivityReport.png|frame| | + | [[File:ActivityReport.png|frame|center|Activity Report Sample]]<br> |
| − | <br> | ||
| − | |||
===== Inactivity Report ===== | ===== Inactivity Report ===== | ||
Inactivity report is used to see how many trucks have not been active for a certain number of days. You can enter how many days as your range and it will return the trucks that fit that range. | Inactivity report is used to see how many trucks have not been active for a certain number of days. You can enter how many days as your range and it will return the trucks that fit that range. | ||
| − | [[File:InactivityReport.png|frame| | + | [[File:InactivityReport.png|frame|center|Inactivity Report Sample]]<br> |
| − | <br> | ||
| − | |||
===== Mileage Report ===== | ===== Mileage Report ===== | ||
The Mileage report is used to see how many miles a technician has travel in your selected date and time range. | The Mileage report is used to see how many miles a technician has travel in your selected date and time range. | ||
| − | [[File:MileageReport.png|frame| | + | [[File:MileageReport.png|frame|center|Mileage Report Sample]]<br> |
| − | |||
===== Parameterized Stop Report ===== | ===== Parameterized Stop Report ===== | ||
The Parameterized Stops report is used get a report of stops the technician has made throughout the day. However, in this report you will be able to filter out stops that do not meet your time parameters. | The Parameterized Stops report is used get a report of stops the technician has made throughout the day. However, in this report you will be able to filter out stops that do not meet your time parameters. | ||
| − | [[File:ParameterizedStopsReport.png|frame| | + | [[File:ParameterizedStopsReport.png|frame|center|Parameterized Stops Report Sample]]<br> |
| − | |||
===== Stops Report ===== | ===== Stops Report ===== | ||
| − | The Stops report is used to get a report of stops the technician has made throughout the day. By clicking on the address, you will open google maps showing the exact location of your vehicle. | + | The Stops report is used to get a report of stops the technician has made throughout the day. By clicking on the address hyperlink, you will open google maps showing the exact location of your vehicle. |
| − | [[File:Stopsreporthyperlink.png|frame| | + | [[File:Stopsreporthyperlink.png|frame|center|Stops Report Sample]]<br> |
| − | |||
===== Consolidated Events Report ===== | ===== Consolidated Events Report ===== | ||
The Consolidated Events report is used to get a report of all the events that have occurred during your selected date range. You will have a list of all the Events that the vehicle/group generated. | The Consolidated Events report is used to get a report of all the events that have occurred during your selected date range. You will have a list of all the Events that the vehicle/group generated. | ||
| − | [[File:ConsolidatedEventsReport.png|frame| | + | [[File:ConsolidatedEventsReport.png|frame|center|Consolidated Events Report Sample]]<br> |
| − | |||
===== Idling Events Report ===== | ===== Idling Events Report ===== | ||
The Idling Events report is used to get a report of Idling Events that the vehicle has generated based on your event description. You can run this report on the company, group or vehicle of your choice. You must also specify a desire date/time range. | The Idling Events report is used to get a report of Idling Events that the vehicle has generated based on your event description. You can run this report on the company, group or vehicle of your choice. You must also specify a desire date/time range. | ||
| − | [[File:IdlingReportSample.png|frame| | + | [[File:IdlingReportSample.png|frame|center|Idling Report Sample]]<br> |
| − | |||
===== Speeding Events Report ===== | ===== Speeding Events Report ===== | ||
The Speeding Events report is used to get a report of Speeding Events that the vehicle has generated based on your event description. You can run this report on the company, group or vehicle of your choice. You must also specify a desire date/time range. | The Speeding Events report is used to get a report of Speeding Events that the vehicle has generated based on your event description. You can run this report on the company, group or vehicle of your choice. You must also specify a desire date/time range. | ||
| − | [[File:SpeedingReport.png|frame| | + | [[File:SpeedingReport.png|frame|center|Speeding Report Sample]]<br> |
| − | |||
===== Stop Summary by Landmark Type Report ===== | ===== Stop Summary by Landmark Type Report ===== | ||
The Stop Summary by Landmark Type report is used to get a summary of how many stops have been made at a specific landmark. How many stops have occurred at that landmark, the total time the vehicle has been parked at that landmark and average time based on the time range. | The Stop Summary by Landmark Type report is used to get a summary of how many stops have been made at a specific landmark. How many stops have occurred at that landmark, the total time the vehicle has been parked at that landmark and average time based on the time range. | ||
| − | [[File:StopSummaryatLandmarkTypeSample.png|frame| | + | [[File:StopSummaryatLandmarkTypeSample.png|frame|center|Stop Summary by Landmark Type Report Sample]]<br> |
| − | |||
===== Trip Report ===== | ===== Trip Report ===== | ||
The Trip Report is used to get information about the technician’s route for your specified date/time range. It supplies the following information. Date/Time of when the Vehicle was started, where it stopped, distance, travel time, idle time and location. | The Trip Report is used to get information about the technician’s route for your specified date/time range. It supplies the following information. Date/Time of when the Vehicle was started, where it stopped, distance, travel time, idle time and location. | ||
| − | [[File:TripsReport.png|frame| | + | [[File:TripsReport.png|frame|center|Trips Report Sample]]<br> |
| − | |||
===== Report Scheduler ===== | ===== Report Scheduler ===== | ||
| Line 80: | Line 65: | ||
Simply follow the wizard to create your report. To create a new report, click on the '''Add New Schedule Report''' icon on the top right of the page. | Simply follow the wizard to create your report. To create a new report, click on the '''Add New Schedule Report''' icon on the top right of the page. | ||
| − | [[File:CreateReportSchedule.png|frame| | + | [[File:CreateReportSchedule.png|frame|center|Create a Report Schedule]]<br> |
| − | |||
<big>'''Define your Report''' Section</big><br> | <big>'''Define your Report''' Section</big><br> | ||
| Line 87: | Line 71: | ||
# '''Report Type''' - Here, you will select the report you wish to schedule. | # '''Report Type''' - Here, you will select the report you wish to schedule. | ||
# '''Email id''' - Here you will enter the email address which should receive the email based on your schedule. | # '''Email id''' - Here you will enter the email address which should receive the email based on your schedule. | ||
| − | If you wish to send the report to multiple | + | If you wish to send the report to multiple recipients, Email addresses should be entered wit a ";" to separate each email address. See the example below: |
ddardon@davisware.com; user2@davisware.com; user3@davisware.com; | ddardon@davisware.com; user2@davisware.com; user3@davisware.com; | ||
<br><br> | <br><br> | ||
| Line 94: | Line 78: | ||
# '''From Date/Time''' - Select the Date/Time Ranges to start from. The Start Date is listed as "Current date -7". This means the report will include 7 days of data each time the report executes. Change the number value to reduce/increase the amount of days. | # '''From Date/Time''' - Select the Date/Time Ranges to start from. The Start Date is listed as "Current date -7". This means the report will include 7 days of data each time the report executes. Change the number value to reduce/increase the amount of days. | ||
# '''To Date/Time''' - Select the Date/Time Ranges to end at. The End Date is listed as "Current date -0". This means the report will include data up to the date the report executes. Change the number value to reduce the amount of days. | # '''To Date/Time''' - Select the Date/Time Ranges to end at. The End Date is listed as "Current date -0". This means the report will include data up to the date the report executes. Change the number value to reduce the amount of days. | ||
| − | NOTE: The times are in 24 hour format. Meaning that | + | NOTE: The times are in 24 hour format. Meaning that 1:00pm should be listed as 13:00, 2:00pm as 14:00 and so on... |
<br><br> | <br><br> | ||
<big>'''Define your Schedule Section'''</big><br> | <big>'''Define your Schedule Section'''</big><br> | ||
| Line 107: | Line 91: | ||
** Daily - Will occur daily, and you can select how many times per day. | ** Daily - Will occur daily, and you can select how many times per day. | ||
** Weekly - Allows you to select who many time per week, and specific days of the week at which the report should occur. | ** Weekly - Allows you to select who many time per week, and specific days of the week at which the report should occur. | ||
| − | ** Monthly - Allows you to select a specific day of the month, at which the | + | ** Monthly - Allows you to select a specific day of the month, at which the report should occur, and if it should occur every month, 2 months, 3 months, etc.. |
* Daily Frequency - Will allow you to select the time at which the report should trigger. | * Daily Frequency - Will allow you to select the time at which the report should trigger. | ||
* Duration - Will allow you to select the range of when this schedule should stop. You may also select "No End Date" so the report continues to run infinitely. | * Duration - Will allow you to select the range of when this schedule should stop. You may also select "No End Date" so the report continues to run infinitely. | ||
Revision as of 11:46, 28 February 2020
Contents
REPORTS Menu
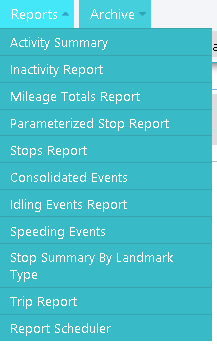
Reports are used to get information on devices. Each report displays different data. We will discuss each report in detail.
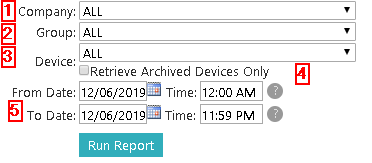
Each report will be displayed as a second window. All reports will have the same options.
- Company - Select the Company. Not required if you only have one company.
- Group - Select the Group. If you select a Group, you do not need to select a Device, as the group selection will print the report for that group. It also helps to filter the next "Device" Field, if you wish to run a report for a single device.
- Device - Select the Device if you wish to review a report for a single Device.
- Retrieve Archived Devices Only - can be used to run reports on a device that is no longer active or deleted. We will archive old data for up to 1 year.
- From/To Date - Is used to select a range of date/time for the report.
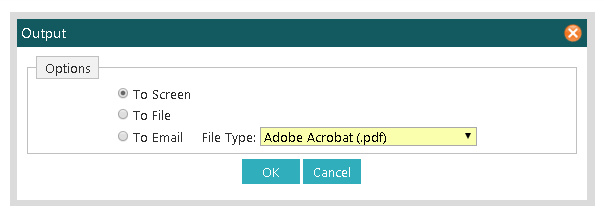
After you have selected your ranges and devices, you will see another page load. This page will prompt for the report delivery. You will have three options:
* To Screen - You can see the report on Screen.
* To File – Sends report to PDF format and downloads the reports for you.
* To Email - Creates the PDF Document and sends it to desired e-mail address.
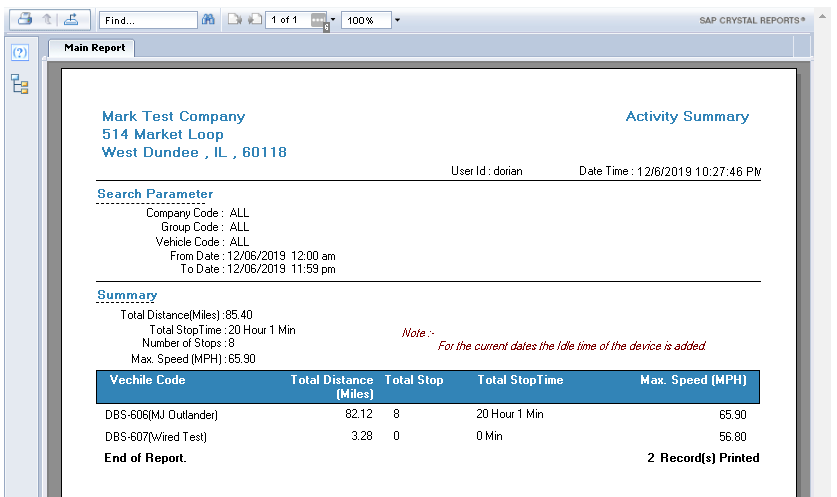
Activity Summary
Activity Summary displays a small quick summary of the vehicle’s data. It is not a detailed report, just quick information for selected date ranges.
Inactivity Report
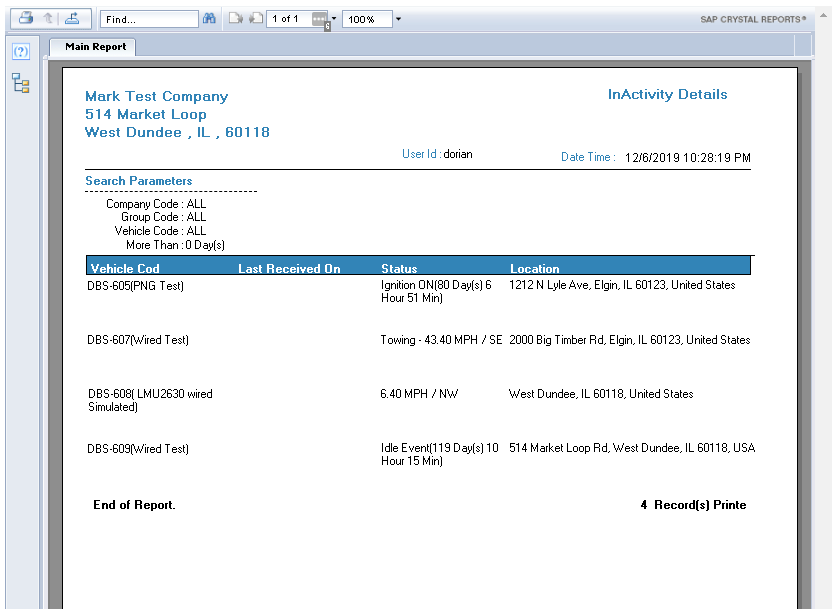
Inactivity report is used to see how many trucks have not been active for a certain number of days. You can enter how many days as your range and it will return the trucks that fit that range.
Mileage Report
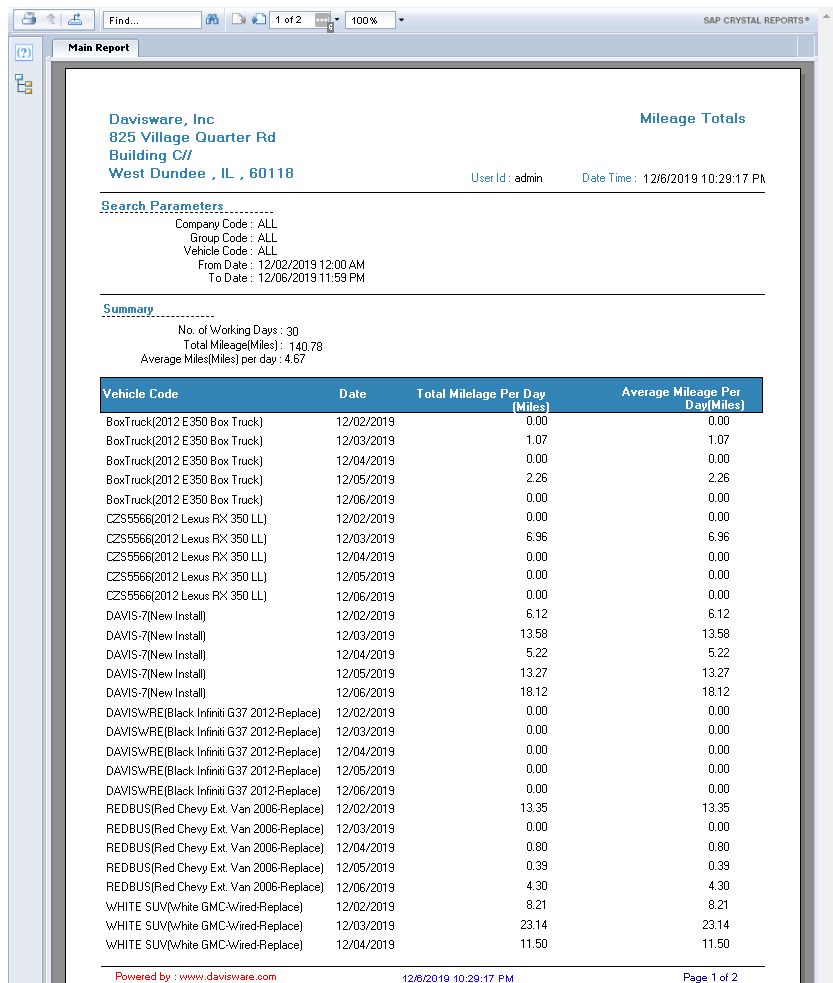
The Mileage report is used to see how many miles a technician has travel in your selected date and time range.
Parameterized Stop Report
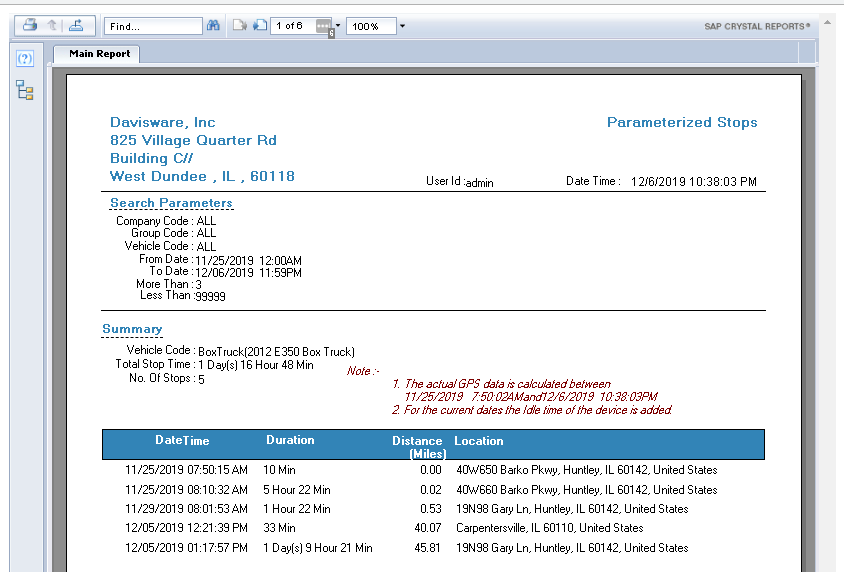
The Parameterized Stops report is used get a report of stops the technician has made throughout the day. However, in this report you will be able to filter out stops that do not meet your time parameters.
Stops Report
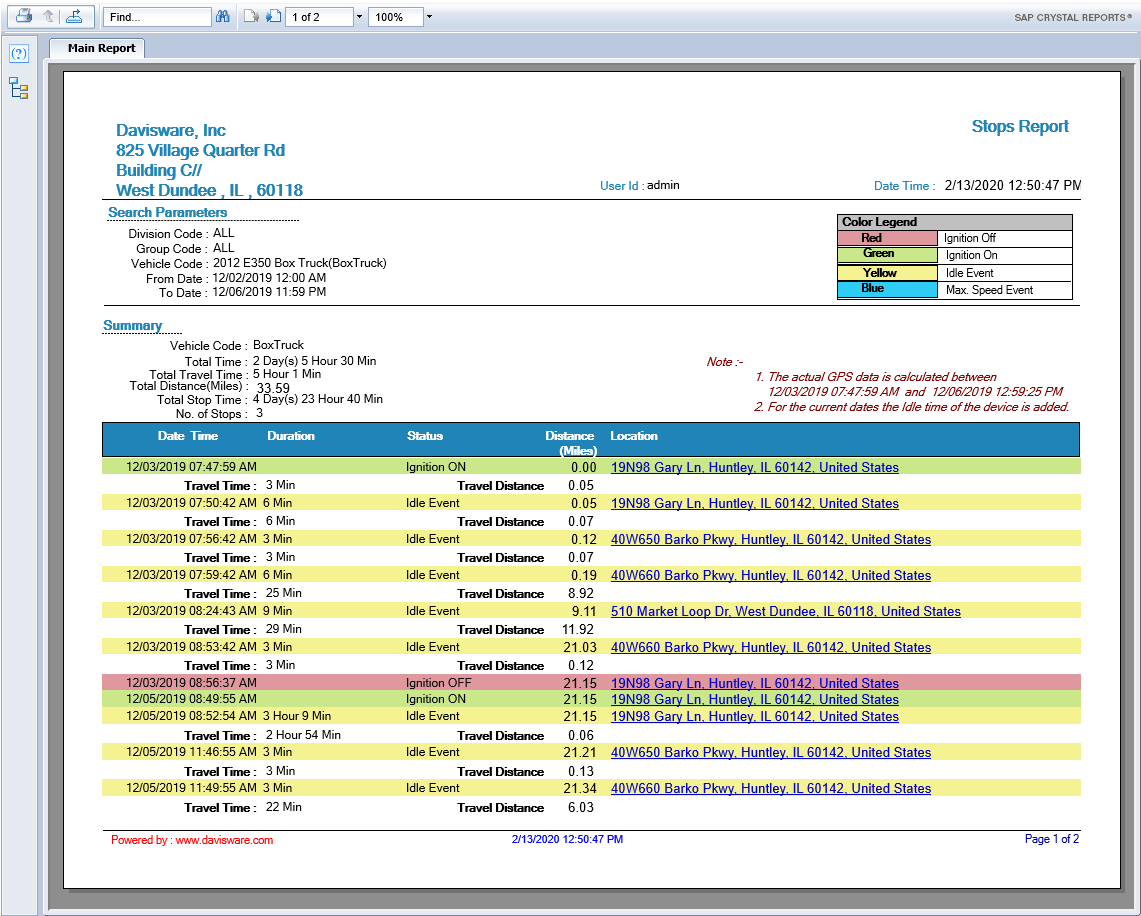
The Stops report is used to get a report of stops the technician has made throughout the day. By clicking on the address hyperlink, you will open google maps showing the exact location of your vehicle.
Consolidated Events Report
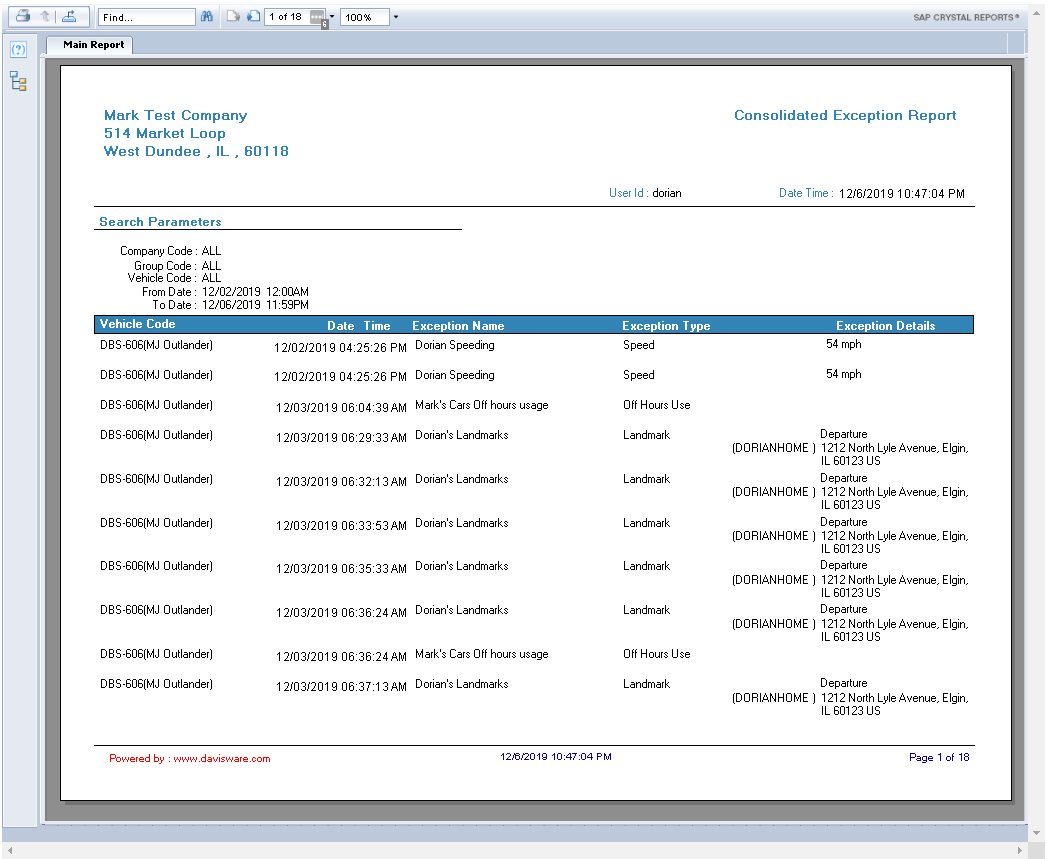
The Consolidated Events report is used to get a report of all the events that have occurred during your selected date range. You will have a list of all the Events that the vehicle/group generated.
Idling Events Report
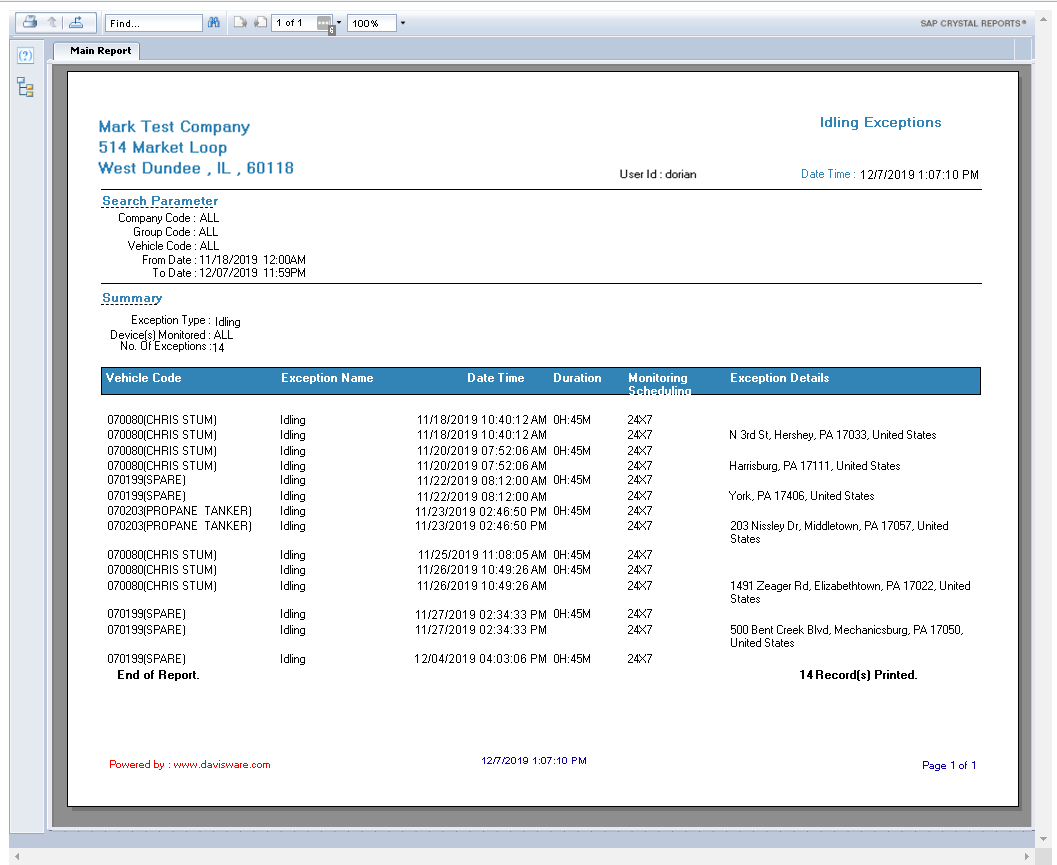
The Idling Events report is used to get a report of Idling Events that the vehicle has generated based on your event description. You can run this report on the company, group or vehicle of your choice. You must also specify a desire date/time range.
Speeding Events Report
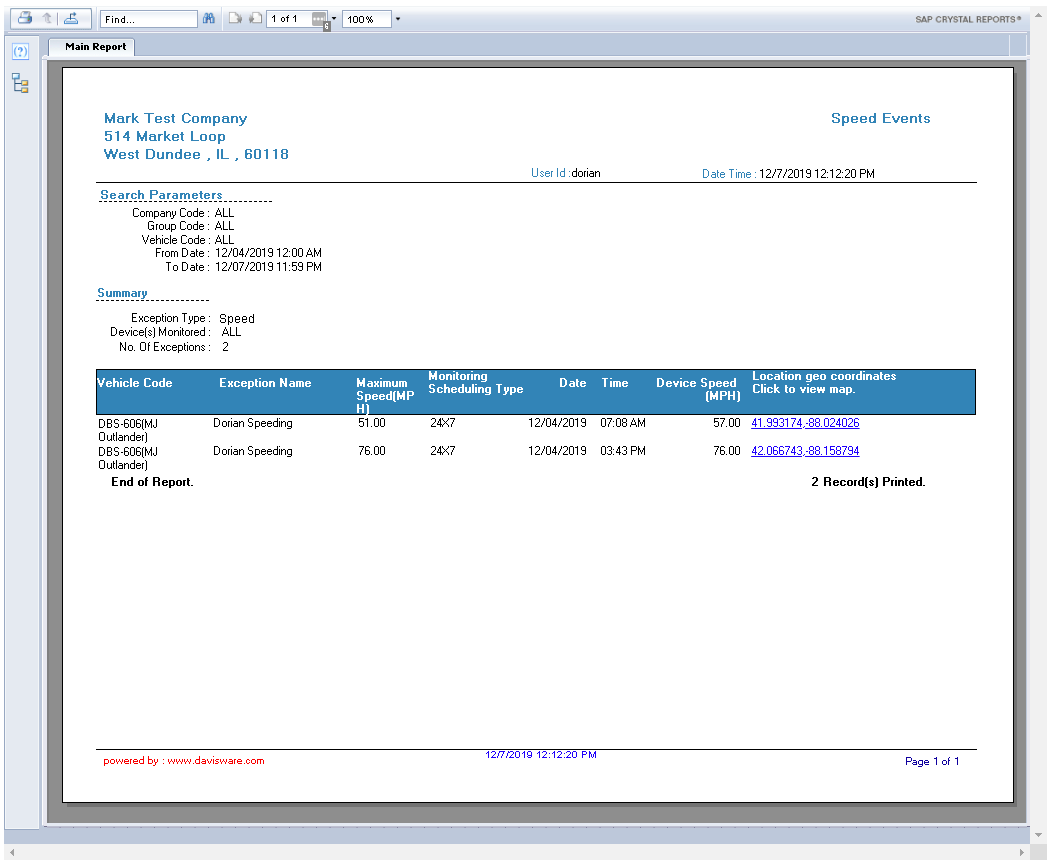
The Speeding Events report is used to get a report of Speeding Events that the vehicle has generated based on your event description. You can run this report on the company, group or vehicle of your choice. You must also specify a desire date/time range.
Stop Summary by Landmark Type Report
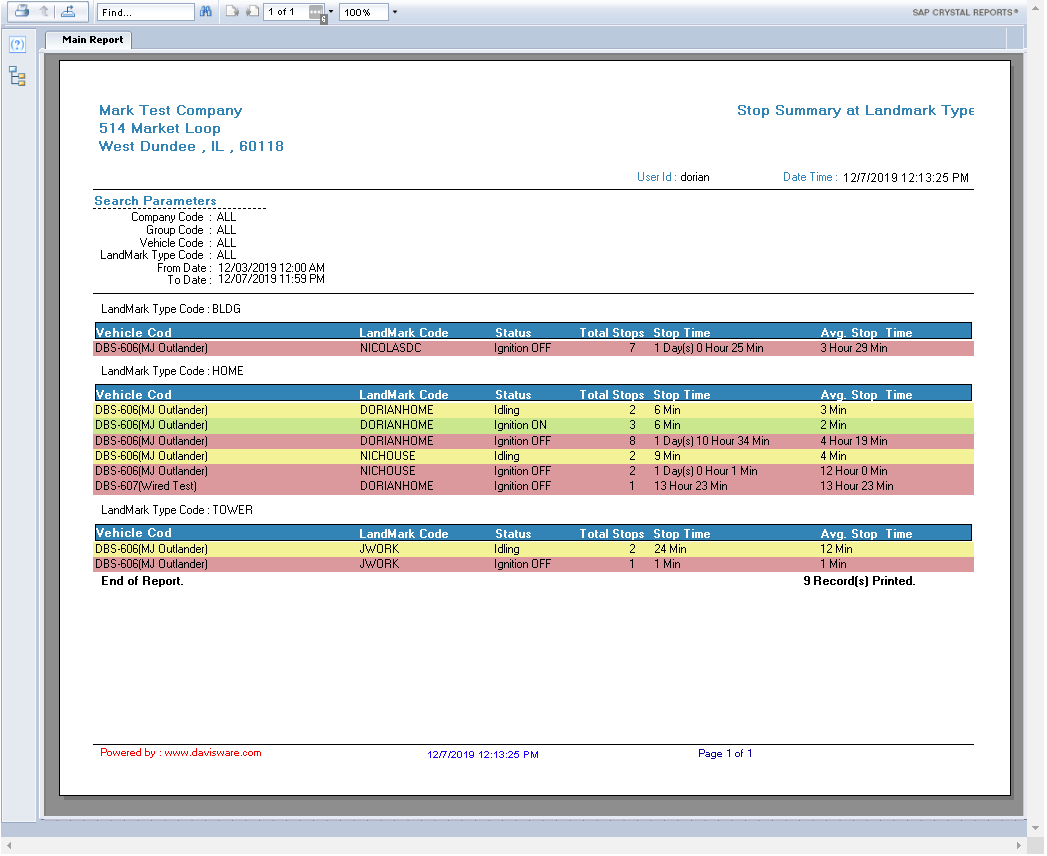
The Stop Summary by Landmark Type report is used to get a summary of how many stops have been made at a specific landmark. How many stops have occurred at that landmark, the total time the vehicle has been parked at that landmark and average time based on the time range.
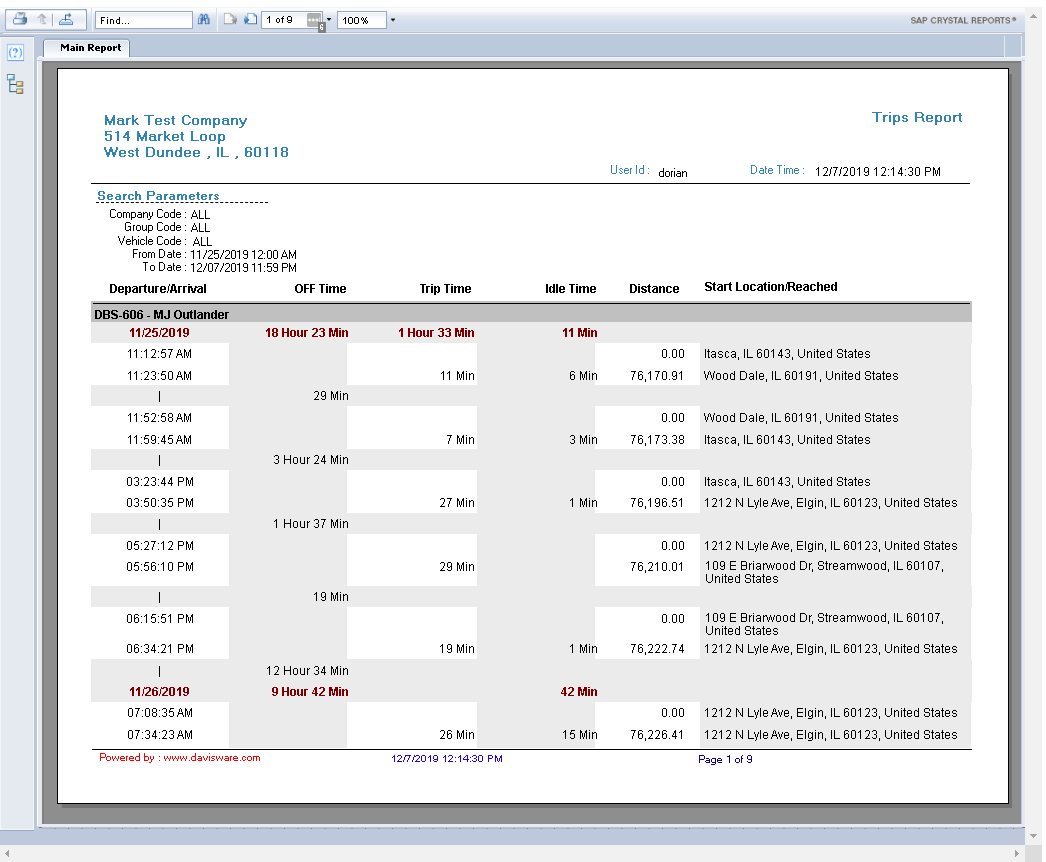
Trip Report
The Trip Report is used to get information about the technician’s route for your specified date/time range. It supplies the following information. Date/Time of when the Vehicle was started, where it stopped, distance, travel time, idle time and location.
Report Scheduler
The report Scheduler is a powerful tool used to deliver automatic reports to defined users. This scheduler allows you to select any of the reports listed in this page, and any date range, at any frequency desired.
Simply follow the wizard to create your report. To create a new report, click on the Add New Schedule Report icon on the top right of the page.
Define your Report Section
- Report Schedule Name - Name your Report to identify it if you wish to modify it again, make the name something memorable to you.
- Report Type - Here, you will select the report you wish to schedule.
- Email id - Here you will enter the email address which should receive the email based on your schedule.
If you wish to send the report to multiple recipients, Email addresses should be entered wit a ";" to separate each email address. See the example below:
ddardon@davisware.com; user2@davisware.com; user3@davisware.com;
Define your Criteria Section
- Company, Group, Device Code - Select the Company, Group, Device Code that you wish to be included in the contents of the report.
- From Date/Time - Select the Date/Time Ranges to start from. The Start Date is listed as "Current date -7". This means the report will include 7 days of data each time the report executes. Change the number value to reduce/increase the amount of days.
- To Date/Time - Select the Date/Time Ranges to end at. The End Date is listed as "Current date -0". This means the report will include data up to the date the report executes. Change the number value to reduce the amount of days.
NOTE: The times are in 24 hour format. Meaning that 1:00pm should be listed as 13:00, 2:00pm as 14:00 and so on...
Define your Schedule Section
- Schedule Type - Select from "One Time" or "Recurring"
Recurring
* Frequency - Select from Daily, Weekly, Monthly
**  Daily - Will occur daily, and you can select how many times per day.
**  Weekly - Allows you to select who many time per week, and specific days of the week at which the report should occur.
**  Monthly - Allows you to select a specific day of the month, at which the report should occur, and if it should occur every month, 2 months, 3 months, etc..
* Daily Frequency - Will allow you to select the time at which the report should trigger.
* Duration - Will allow you to select the range of when this schedule should stop. You may also select "No End Date" so the report continues to run infinitely.
Summary Section
Will show summary description of the report so that you can easily ready the specifications of the report.
This concludes the Reports Section
