Difference between revisions of "Wintac"
| Line 3: | Line 3: | ||
Davisware will handle this setup, but we will explain how this is linked. | Davisware will handle this setup, but we will explain how this is linked. | ||
| − | Below is the RFV Interface (GOF Module) under Business Options. It consists of 5 fields: | + | Below is the RFV Interface (GOF Module) under Business Options/Links. It consists of 5 fields: |
[[File:WintacIntegrationSetup.png|frame|center|WintacIntegration-WintacIntegrationSetup]] | [[File:WintacIntegrationSetup.png|frame|center|WintacIntegration-WintacIntegrationSetup]] | ||
| Line 19: | Line 19: | ||
The first step to follow is to set up your vehicles in Wintac under Vehicle Manager. | The first step to follow is to set up your vehicles in Wintac under Vehicle Manager. | ||
| − | Your vehicles will be tied to a GPS unit and also linked to the | + | Your vehicles will be tied to a GPS unit and also linked to the technician so the system knows where to send Service Orders. |
First, we suggest you create a list of all your vehicles and their designated drivers so it is easier to look at your fleet. Note the Make, Model and Year of the vehicles. | First, we suggest you create a list of all your vehicles and their designated drivers so it is easier to look at your fleet. Note the Make, Model and Year of the vehicles. | ||
| Line 32: | Line 32: | ||
* Model of the Vehicle.<br> | * Model of the Vehicle.<br> | ||
* '''GPS LABEL Is VERY Important'''. This is how the Vehicle will be assigned to the GPS unit. In RFV, the Vehicle Code must match your GPS Label in Wintac.<br> | * '''GPS LABEL Is VERY Important'''. This is how the Vehicle will be assigned to the GPS unit. In RFV, the Vehicle Code must match your GPS Label in Wintac.<br> | ||
| − | * Tech is another important field. This will link the employee to the vehicle. You will select your technician’s code to link the Driver to the vehicle. | + | * '''Tech is another important field'''. This will link the employee to the vehicle. You will select your technician’s code to link the Driver to the vehicle. |
After all this is done, please click FINISH.<br> | After all this is done, please click FINISH.<br> | ||
| Line 39: | Line 39: | ||
Now, repeat this process for your other vehicles. | Now, repeat this process for your other vehicles. | ||
| − | |||
| − | |||
| − | |||
| − | |||
| − | |||
| − | |||
| − | |||
| − | |||
You have completed the Wintac setup. Now we have one more item to cover in the RFV Application. Please login to https://rfv.davisware.com to continue. | You have completed the Wintac setup. Now we have one more item to cover in the RFV Application. Please login to https://rfv.davisware.com to continue. | ||
Latest revision as of 14:44, 26 February 2020
Contents
Wintac INTEGRATION
Connecting RFV to Wintac Data
Davisware will handle this setup, but we will explain how this is linked.
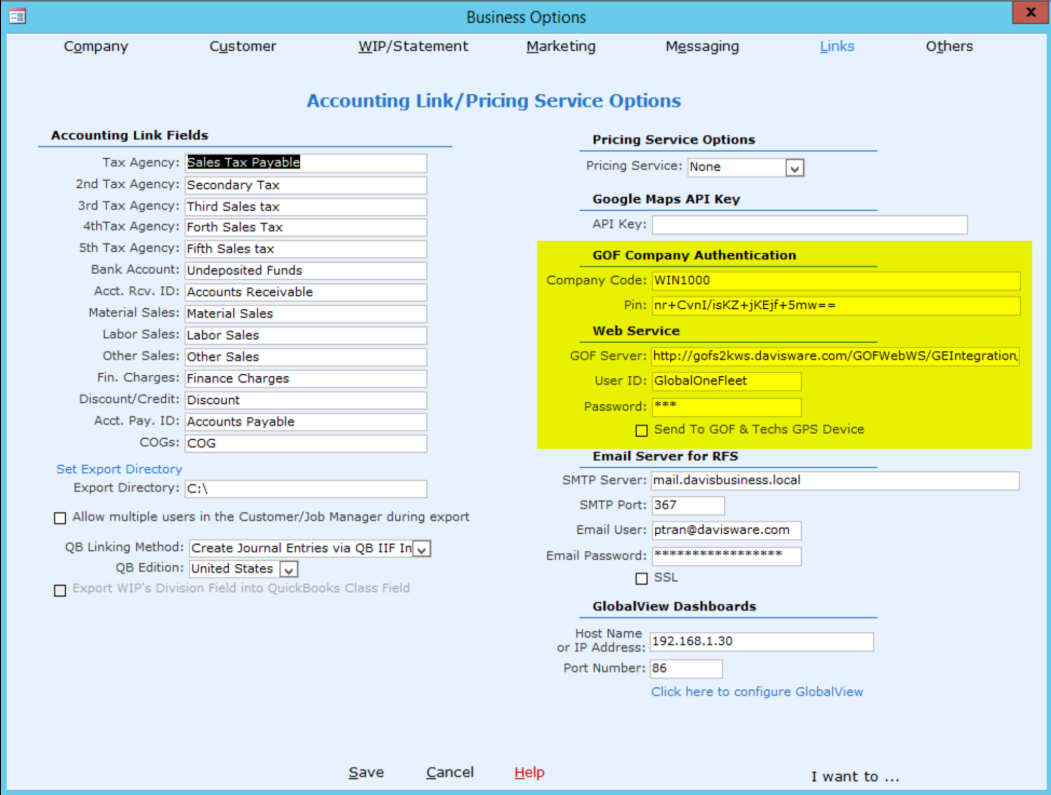
Below is the RFV Interface (GOF Module) under Business Options/Links. It consists of 5 fields:
Company Code – This is your company code. We will authenticate your vehicles by using this code.
Pin – This is an encrypted Pin to link your company to our RFV server.
RFV(GOF) Server ‐ This is the web address where your Wintac Data will be sent to. This is our RFV Server.
User ID and Password – Login for RFV Server
If this information is not filled in, there is no successful connection to RFV from Wintac. Please contact Wintac Support for assistance with this setup.
Setting up Wintac Vehicles
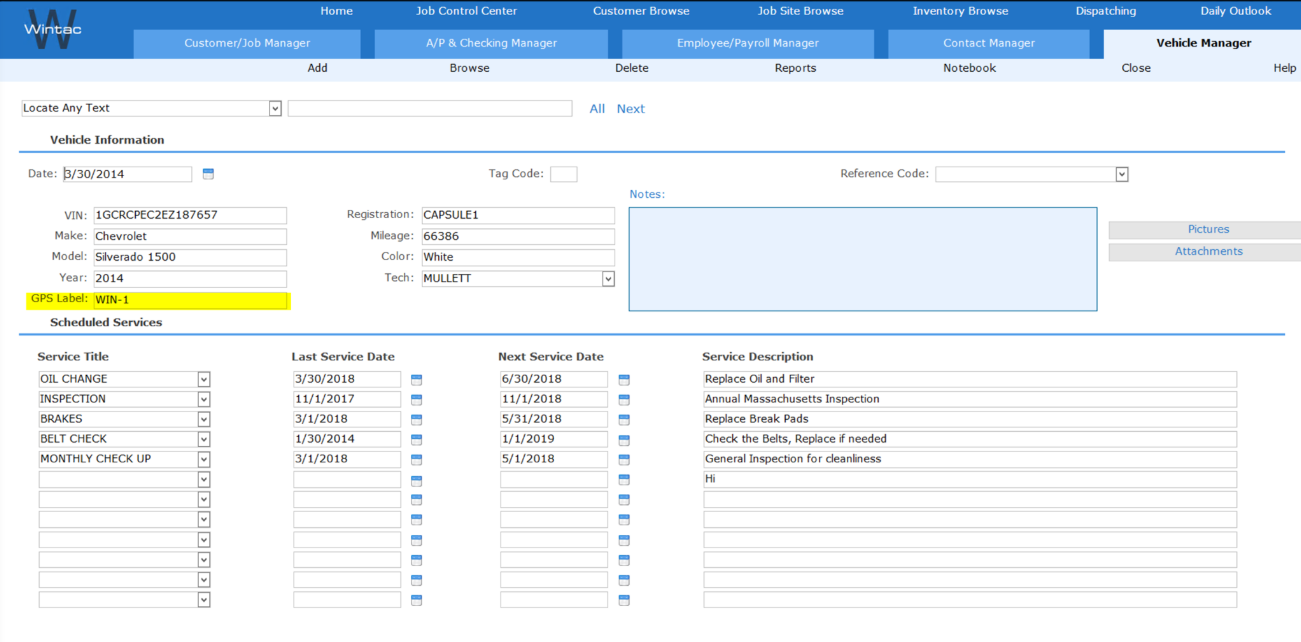
The first step to follow is to set up your vehicles in Wintac under Vehicle Manager.
Your vehicles will be tied to a GPS unit and also linked to the technician so the system knows where to send Service Orders.
First, we suggest you create a list of all your vehicles and their designated drivers so it is easier to look at your fleet. Note the Make, Model and Year of the vehicles.
When creating new vehicles, please fill in the recommended fields below:
Vehicle Information:
- The Year of the Vehicle.
- Make of the Vehicle.
- Model of the Vehicle.
- GPS LABEL Is VERY Important. This is how the Vehicle will be assigned to the GPS unit. In RFV, the Vehicle Code must match your GPS Label in Wintac.
- Tech is another important field. This will link the employee to the vehicle. You will select your technician’s code to link the Driver to the vehicle.
After all this is done, please click FINISH.
NOTE – We highly recommend that on your list of vehicles, you write down the Wintac Tech Name as it will be used in later steps.
Now, repeat this process for your other vehicles.
You have completed the Wintac setup. Now we have one more item to cover in the RFV Application. Please login to https://rfv.davisware.com to continue.
Assigning the GPS Device to Technician
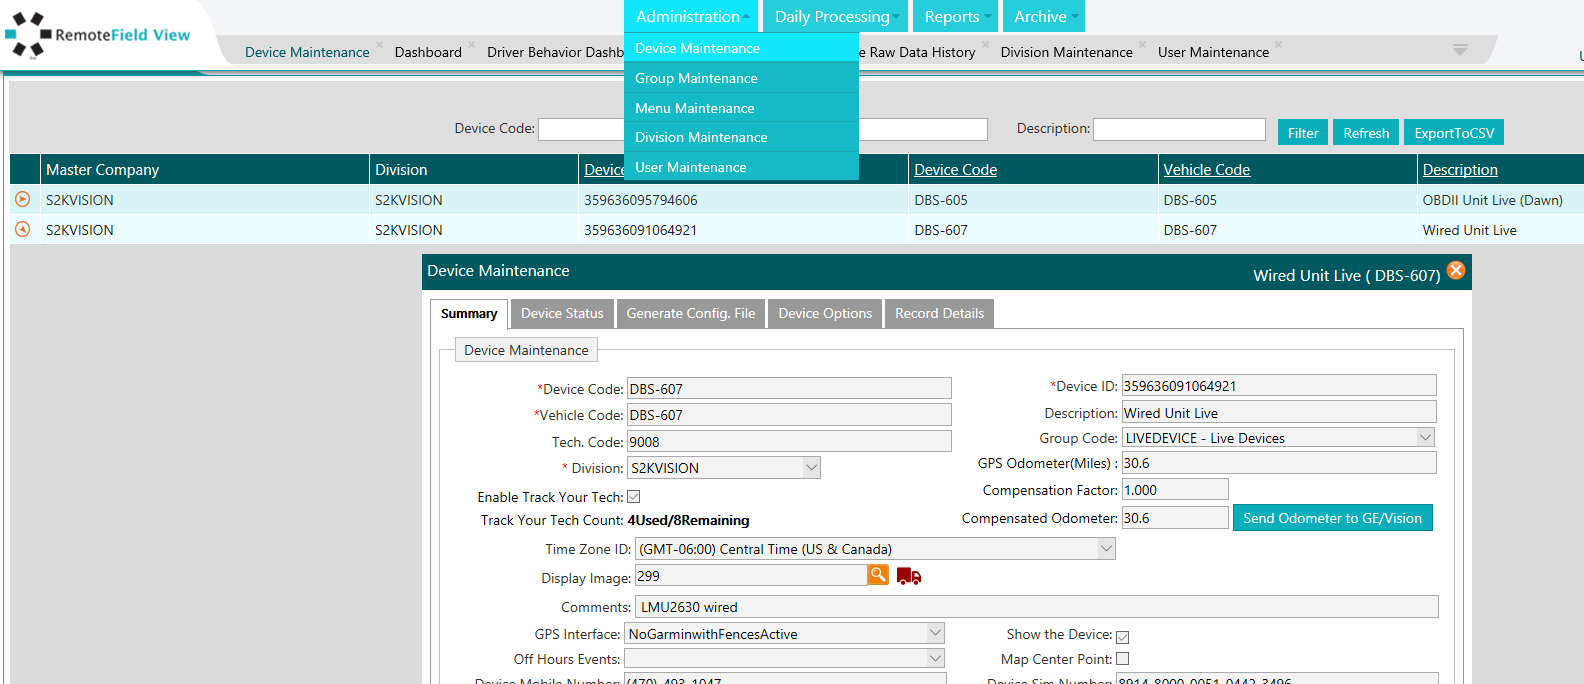
In RemoteFieldView, navigate to ADMINISTRATION DEVICE MAINTENANCE.
Find the first device to edit and expand the device’s properties and click EDIT.
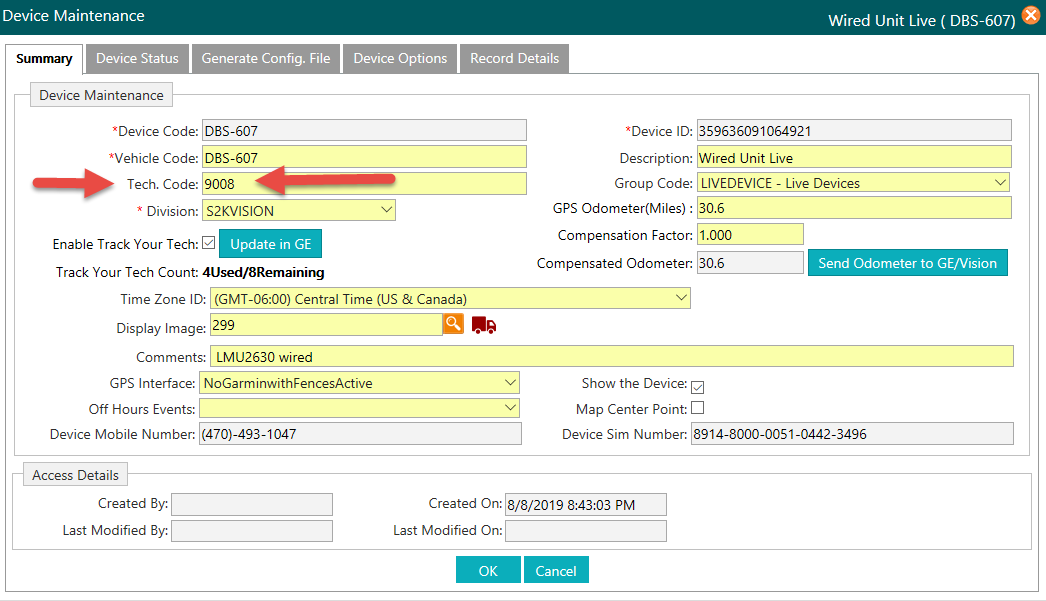
Under the field called TECH CODE. Enter the Wintac Employee Number to complete the integration. Click OK.
Repeat the steps for the remaining vehicles.


